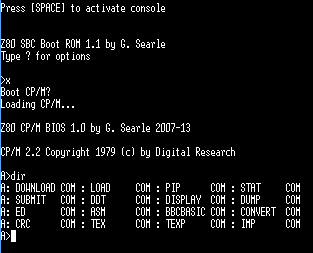
While chatting to a friend recently about an old Z80 CP/M machine I built based on Grant Searle’s Z80 CP/M machine, I decided to fire the machine up for a demonstration and give it a try.

The machine had been in a shelf in my conservatory for well over a year since I last powered it, and when I connected the power, it was clear that there were signs of life, but, the machine was not happy at all! I could see bus conflicts on the data bus as well as very ‘broken’ behaviour.
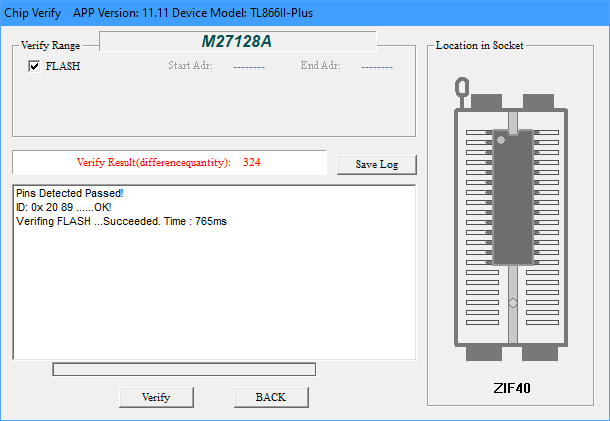
After probing around, I decided to check a couple of logic gate (those controlling the address and read/write lines) using my TL866ii+ programmer which conveniently supports logic gate testing and RAM testing. All of the logic gate ICs confirmed to be working correctly, as did the 128Kx8 RAM chip. Checking the EPROM yield a different story!
Forgetful EPROM
Some of the bits towards the end of the ERPOM had been erased (with UV erased parts, this means a ‘0’ bit had become a ‘1’ bit). The snapshot below shows in red bytes that had failed the verification.
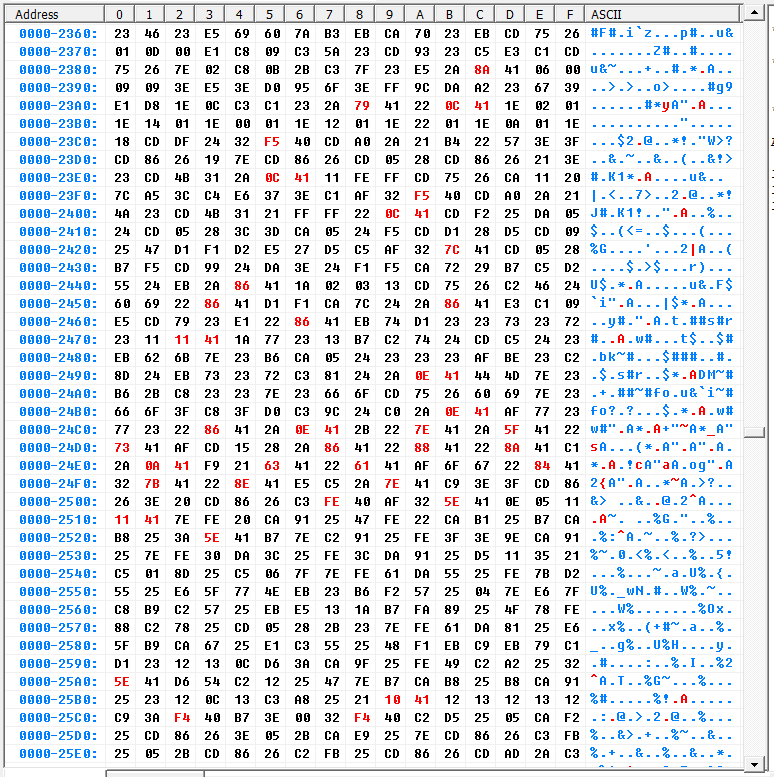
The first 0x2012 bytes were completely unaffected with 324 differences in total (just under 2% of the 0x3FFF bytes in the 16KB ROM) mainly concentrated in the end of the address range.
This teaches me to always cover the UV window with something opaque as per the datasheet’s advice. I know people say that sunlight can erase such devices, I never really believed them. As an aside, others have looked into this, which I had not seen until now: see this hack-a-day article for a timelapse of EPROM data when exposed to sunlight.
And, secondly, it left me in a quandary as to how I should restore the ROM code.
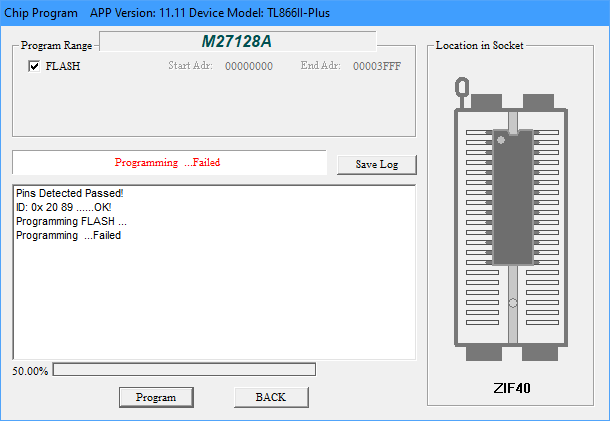
Initially I thought I should just be able to reprogram the device over the top of the existing code, since the changed bits would be reprogrammed back to ‘0”s from their current ‘1’ state. But, this turned out not to work. I’m not sure why, but the programmer would fail at 50% – just about the time the corrupt bits arrived.
I decided the next thing to do was to try and erase the IC – but how!?
Erasing UV EPROMs
I didn’t have one of the classic EPROM eraser boxes with a timer and a nice antistatic mat. I’d have to improvise. Essentially tinker around until the PROM was erased (reading 0xFF in all locations).

My first attempt was with a DSLR camera flash. I had seen these cheap EPROM erasers online that look like a xenon flash tube, so figured it was worth a shot. However it made no difference at all – I assume the camera flash has an UV filter.
My second attempt was with a UV LED, inspired Charles Ouweland‘s investigations along similar lines. Charles reports that this took 48 hours to erase the PROM. Like always, I was in a rush, so this didn’t really work for me. I could have driven a roundtrip to my parents (Dad has a proper UV eraser) in less then 4 hours including a cup of tea and a chat with Mum!
The third attempt was to use a UV insect-o-cutor which features UV fluorescent tubes as in the UV141 eraser pictured above. I placed the chip on the desk mat and put the UV insect-o-cutor directly on top such that the finger guard was on the top of the IC and the bars were not obscuring the window.

The scary part of this was that the high voltage aspect of the bug-zapper was popping on occasion with small insects – thankfully, the insects popping did not obscure the IC window nor cause ESD damage! After 20 minutes (the usual time I run the UV141 for) the IC was exactly the same. No additional bits had be cleared to logic ‘1’s. I suspect the output is UV-A and not the required UV-C.
Making a UV-C EPROM Eraser
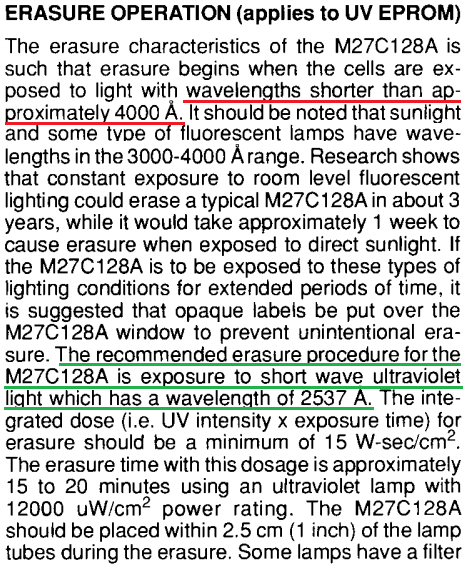
I went back to the second approach with the LED, this time consulting the EPROM datasheet (extract below), and noted that the recommended wavelength for erasure is 2537Å (253.7nm). This puts the UV light required to erase the EPROM in the UV-C spectrum.
I set about trying to find an LED with the correct wavelength. Some more digging showed up the VLMU35CB20-275-120 UV-C (270-280nm peak) LED offering a typical 13.5mW. Such wavelengths are common for curing acrylic nails and for sterilising surfaces in medical applications. At the time of writing, one such LED costs around £4.50 with VAT.

Constant LED Current
These LEDs appear to require between 5.0 and 7.5V at 120mA. I opted to create a simple constant current device using an LM317 set to 120mA and the two LEDs in series. This should work fine when supplied with at least 18V (7.5V + 7.5V + 3V [LM317 dropout voltage]). A SOIC8 LM317 is capable of 200mA and low profile enough to allow the LEDs to be close to the EPROM without catching. R1 is chosen to cause a voltage drop of 1.25V (the LM317 reference voltage) at the desired current. See this TI flashback for more details.

R1 = 1.25V/I = 1.25/120mA = 1.25/120e-3 = 10.4Ω. The closest easily available value is 10Ω, which checking backwards would give a current of 125mA. Since the datasheet mentions 150mA supply giving increased power, I have chosen to go with 10Ω as this will not damage the LED.
We should also consider the size of R1. The power dissipated in the resistor is easily calculated:
P = I^2 x R = (125mA)^2 x 10Ω = 120e-3^2 x 10 = 0.144W = 144mW.
So, a standard ¼-Watt through-hole resistor would be fine. For surface mount, 0805 resistors are typically 100mW, so a combination of multiple resistors should be used to handle the power. This could be four 10Ω parts in series-parallel, two 22Ω resistors in parallel (making 11Ω [114mA in the LEDs]), or two 4.7Ω resistors in parallel (making 9.4Ω [133mA in the LEDs]). I’ll opt for two 4.7Ω resistors since this is still below the maximum recommended working current of 150mA.
Designing the PCB
Initially I had considered tacking two wires on the LED and using a lab power supply to power the LEDs. However, I figured if I was making a constant current supply – mainly to avoid a “oops!” moment and pop £8 worth of LEDs – I would make a PCB to house it all. This way, I could keep the board with the EPROM programmer in the programmer box. The design brief would be simple. The PCB should fit inside the EPROM programmer (TL866ii+) box. The PCB should be (maximally) 110x50mm. I figured 100x50mm would be a nice size. A 5.5×2.1mm DC jack would allow for easy connection to wall-wart PSU or other power source. The rest was just two LEDs, and LM317, two resistors and a decoupling capacitor or two!
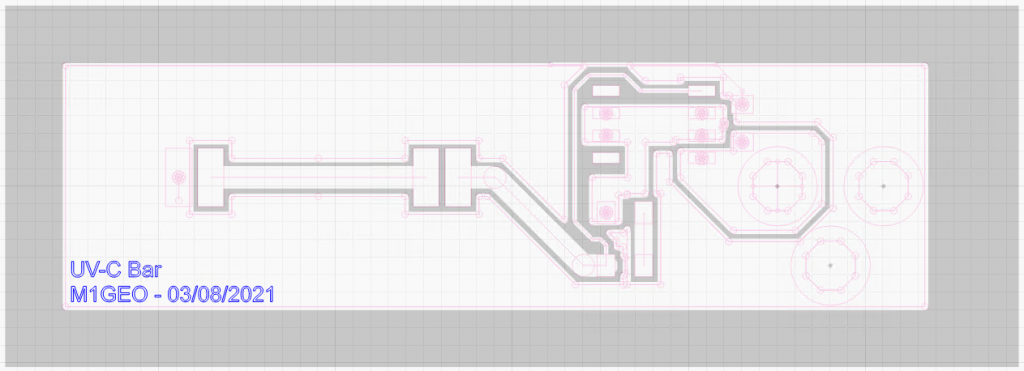
Since the PCB is quite simple, I figured it would be a good candidate to make with a laser cutter. Above shows an overlay of the Gerber edges and the layer to be etched. The back areas are there copper is to be removed. The white areas will remain copper.
The board was created by coating a standard single-sided FR1 copper PCB blank with black paint from an aerosol can. This will be used as the etchant mask. The laser cutter is then able to remove the mask by burning away the paint layer, exposing the copper to the etchant.

Typically, I’d also cut a solder mask from mica sheet to help apply paste, but for such a simple board, it isn’t worth the extra effort and waste materials.
The next job is to etch the PCB in ferric chloride – you should strive to make a much better job than I did!
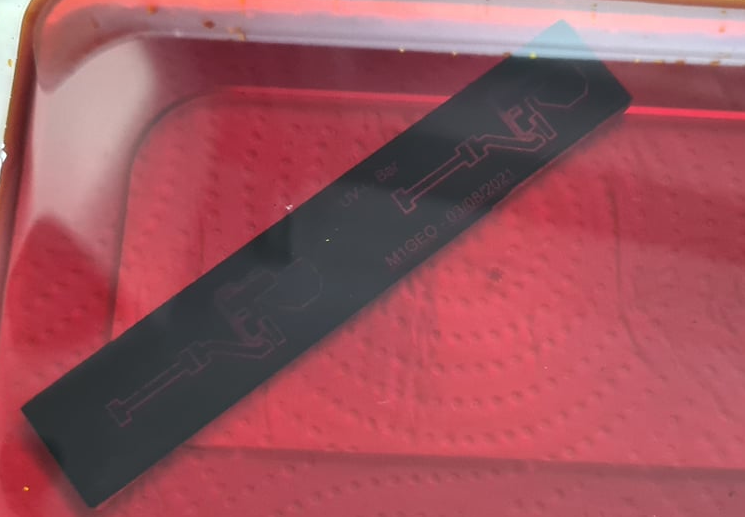
I completely over-etched by board by having the etchant too cold and leaving it far too long! But hey, it’s been 10 years since I last made a PCB in my (parents) kitchen sink!

From the image above you can see that my 10 thou track has completely disappeared in the right etch, and has almost completely disappeared in the left. I then proceeded to make a mess of drilling the connector holes, misreading a 4mm drill as a 2 mm. The board ended up as a total mess, but, I got it working!

My apologies for making such a mess of the board. However, as you can see, the two LEDs are lit and a current of 117.3 mA flows through the series LEDs. I may tweak the resistor values to get an extra 10mA or so, but for now, the result is good enough!
So, now to erase the EPROM
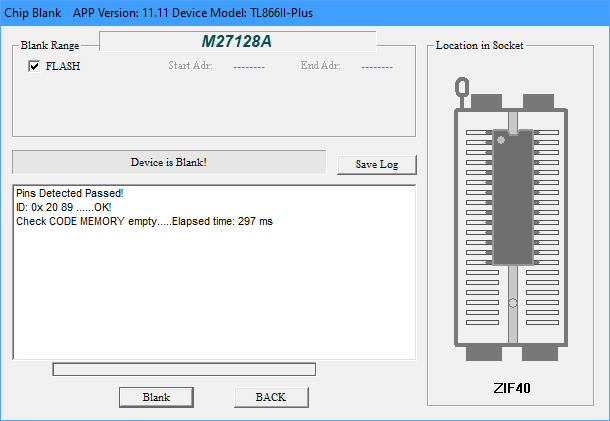
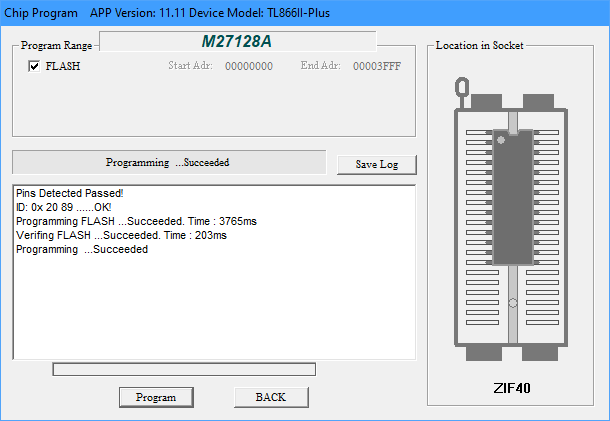
With the PCB made up, I eagerly put the EPROM back into the reader and loaded the old ROM code in. I reverified it to see that indeed 324 mismatches showed up, just as before. Confirmation that all my previous attempts had failed!
I held the newly made PCB above the UV window and gave the EPROM a 1 minute ‘blast’. I read the EPROM again, curious to see how many extra bytes failed verification. Too my surprise, 1088 byte failed verification – considerably more than before. I looked through the data and could see a pattern; the EPROM was blank. Sure enough, the 1 minute blast was enough to clear the EPROM!
I guess it just goes to show what having the right tools for the job can do!
Now will the computer boot?
Since I was on a roll, I reprogrammed the EPROM with the Z80 CP/M code and went for a test boot.
And we’re back to life! This is a machine based on Grant Searle’s Z80 CP/M machine.