
Soundmodem is a Multiplatform Soundcard Packet Radio Modem written by Thomas Sailer, HB9JNX/AE4WA. The software allows a standard PC sound-card to be used as a packet radio “modem” with all processing done on the main computer CPU.
On this page I will describe how to get the basic network interface working and how that can be used with XASTIR, a amateur radio based digital communication system for real-time exchange of digital information to users on the APRS (Automatic Packet Reporting System) network, 144.8000 MHz in Europe. I also extended the settings to experiment with TCP/IP over AX25, for the technical exercise. These TCP/IP experiments are outside the scope of the basic sound modem and may (in the future) make another article of their own!
Install The Software
The exact version number of Soundmodem I used is hard to find. The program doesn’t report version number or offer it up anywhere. I compiled the latest version 0.18 from Thomas Sailer’s website and the feature set looked very similar to the standard repository version, so I make no effort to compile the (possibly newer) version. Install soundmodem from the standard Ubuntu/Debian repository:
sudo apt-get install soundmodem
The process is quick and results in something like this:
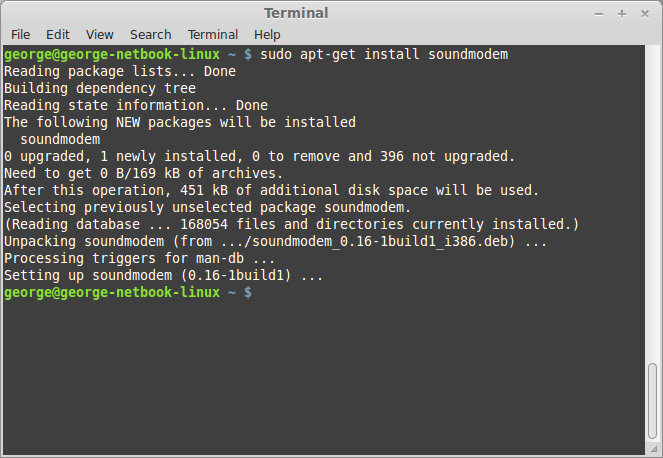
This installs two programs: soundmodem and soundmodemconfig which are the modem and the configuration tool respectively. These are the key programs you will want. We may also like a few extra AX25 programs, such as
sudo apt-get install ax25-apps ax25-utils ax25mail-utils ax25-tools ax25-xtools xastir
If you get an error saying that “Package ax25-utils is not available”, try the following (Thanks to Silvio, DO1SIL):
sudo apt-get install libax25 ax25-apps ax25mail-utils ax25-tools ax25-xtools xastir
These include many of the supporting programs that make the kernel’s AX25 support usable outside TCPIP. Xastir, as mentioned, does the mapping for APRS.
Hardware
The hardware I use is a homebrew interface. It’s a USB soundcard (cheap £2 Chinese thing, no brains or codec) and a cheap USB RS232 TTL UART interface (PL2303). The soundcard is coupled so that received audio from the radio goes into the microphone and speaker audio from the sound card is transmitted by the radio. Follow the radio manual instructions to wire it all up and set levels appropriately.
The PTT is either done by VOX (in which case you may need to tweak your TX Delay to give time for the VOX to work, see later) or you can make a PTT circuit from the RTS of your computer serial port to the PTT of your radio. A simple NPN transistor with current limit resistor will work just fine!
Setting Up Soundmodem
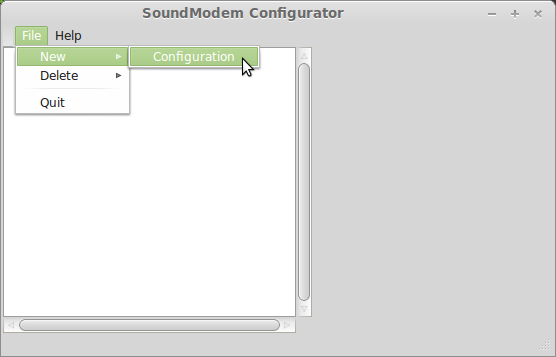
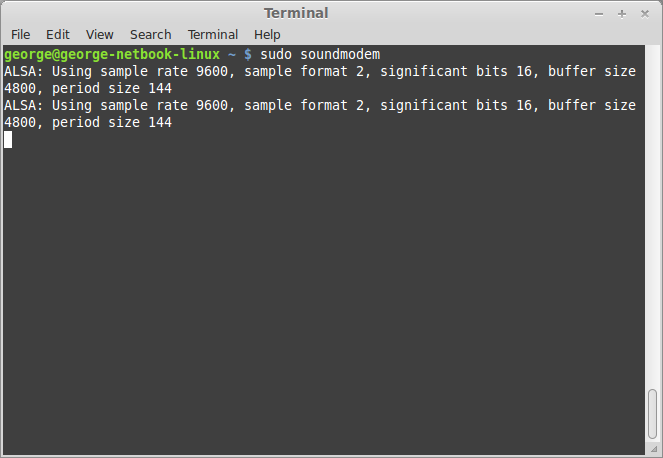
Run the sound modem configuration program as root! It writes to system files.
sudo soundmodemconfig
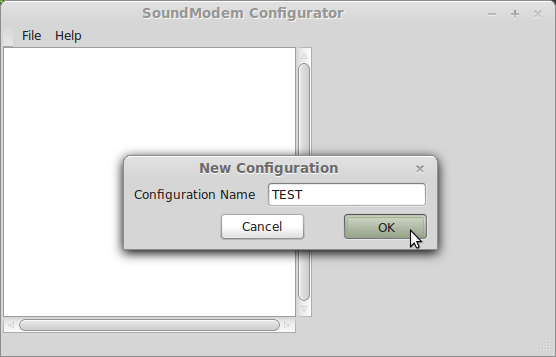
Start a new configuration with File > New > Configuration.
Give the configuration a name more descriptive than “TEST”
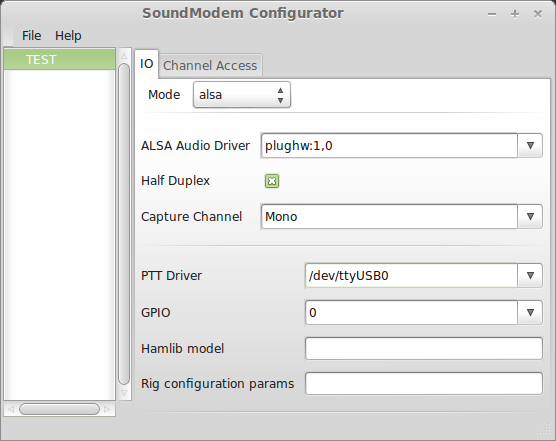
Select the newly created configuration on the left hand side and the right side will populate. Here I change the Mode to ALSA. You need to select the ALSA Audio Driver. Use “plughw:” (not “hw:”) because the plughw interface allows ALSA to match the sampling rates and provide some kind of DSP/numerical wizardary if required. To find the card number, match your device with the available cards:
george@george-netbook-linux ~ $ cat /proc/asound/cards
0 : HDA-Intel – HDA Intel
HDA Intel at 0xf0300000 irq 48
1 : USB-Audio – Generic USB Audio Device
Generic USB Audio Device at usb-0000:00:1d.3-1.1, full speed
As you see, here I use “plughw:1,0” as this is the USB device connected – this is the USB sound card I am using in my interface. You notice that /dev/ttyUSB0 is used for the PTT driver here instead of VOX. As mentioned, soundmodem uses RTS as the radio PTT line, and DTR as the DCD line for an LED. Leave GPIO as 0 and the Hamlib stuff empty as they are for more advanced features.
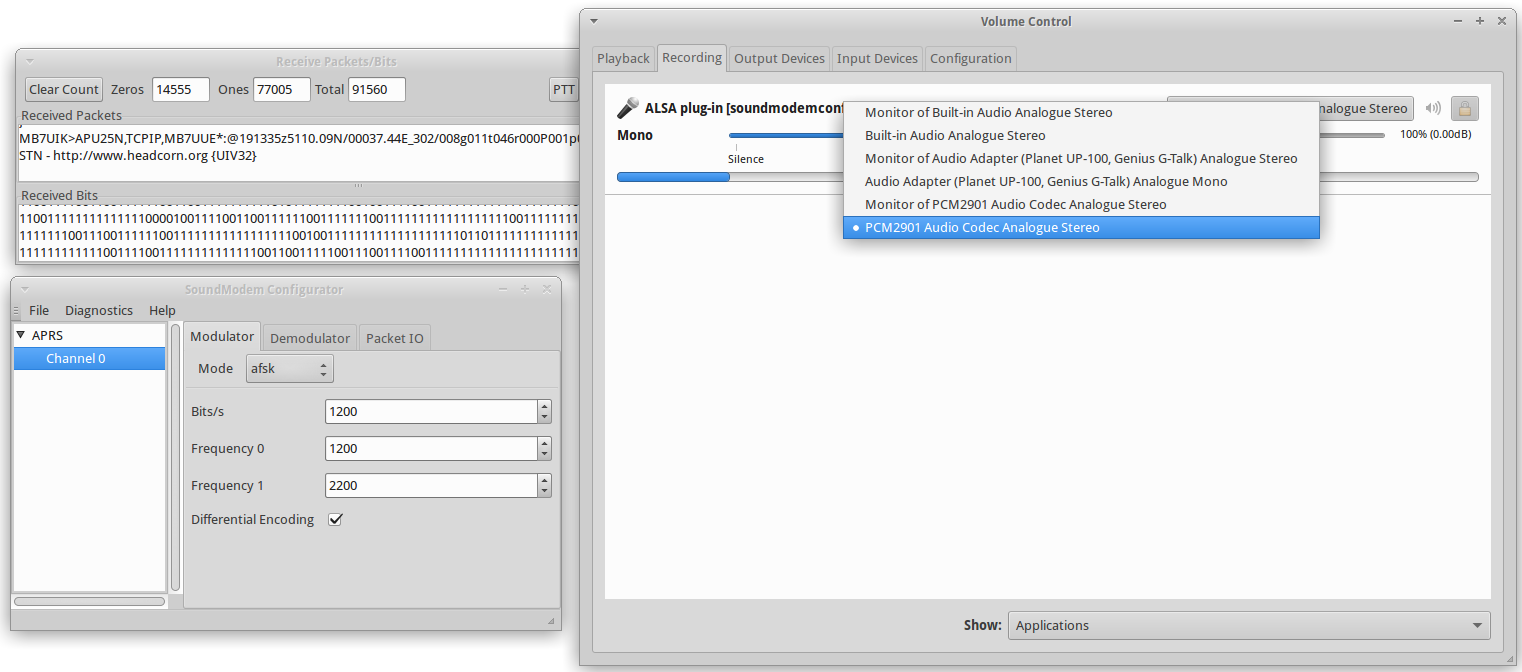
As an edit to the part above, it is probably easier to type “default” under ALSA audio driver, and then use PulseAudio to graphically configure the audio flow using the PulseAudio Sound Settings (Volume Control) configuration menu (speaker in system tray) You will then be able to select the audio source from the dropdown, as shown below – just one thing to remember, you’ll need to do this twice; once for soundmodemconfig and again for soundmodem. Also be aware, programs only show up as visible when they’re actually recording audio, so you will need to enable something like the scope, spectrum or modem (as here) so that recording and decoding take place.
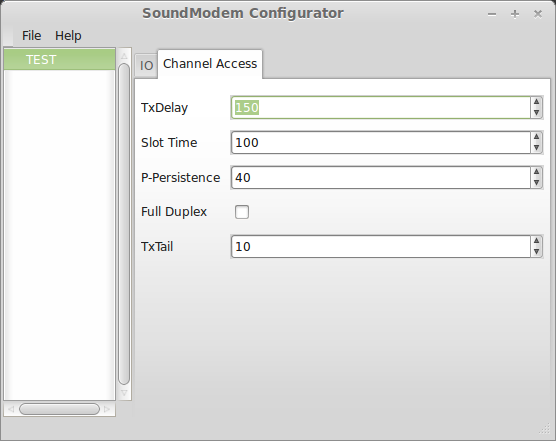
On the Channel Access tab, you set the access parameters for the channel. These include the TX Delay (time between keying the radio and sending data, in milliseconds), Slot Time (time to wait for a free timeslot in the channel, in milliseconds), Persistence (back-off/wait factor upon sensing clear channel) and TX Tail (time between end of data and de-keying transmitter, in milliseconds). These settings are explained well here.
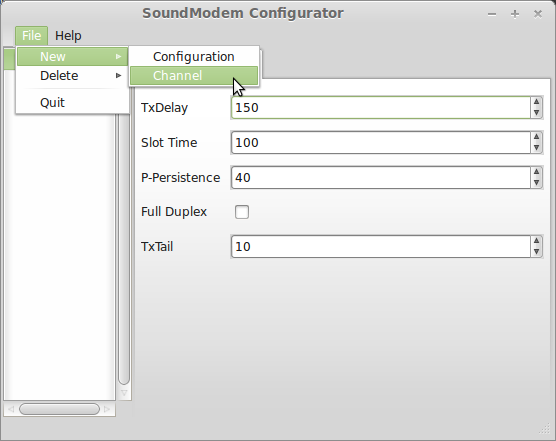
Next create a new channel with File > New > Channel.
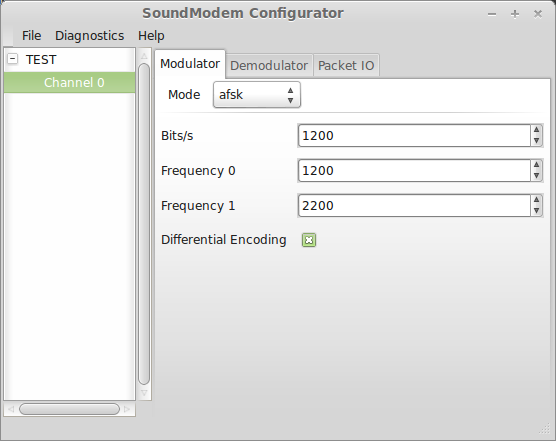
On the modulator tab, set AFSK as the mode, 1200 bits/second for the rate and the two frequencies 0 and 1 of 1200 and 2200 respectively. Differential encoding must be ticked.
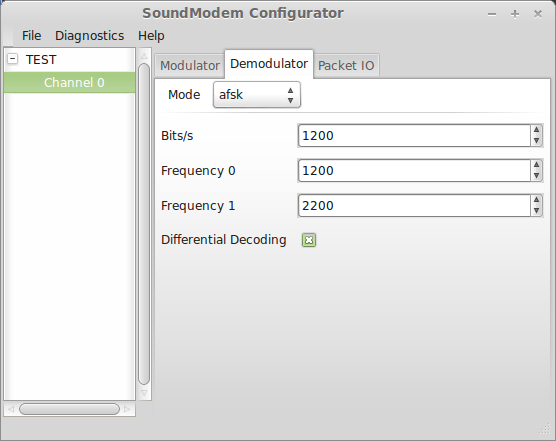
As with the modulator tab, repeat for the demodulator tab and set AFSK as the mode, 1200 bits/second for the rate and the two frequencies 0 and 1 of 1200 and 2200 respectively. Differential decoding must be ticked.
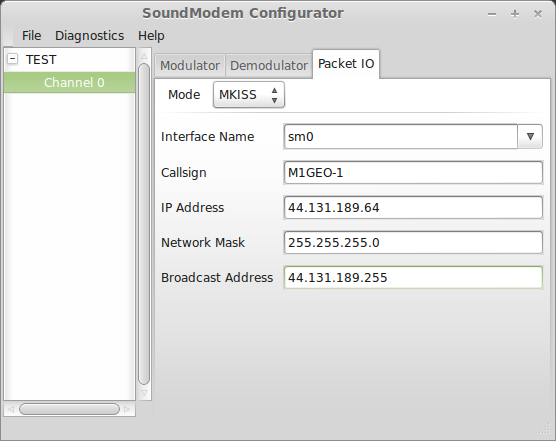
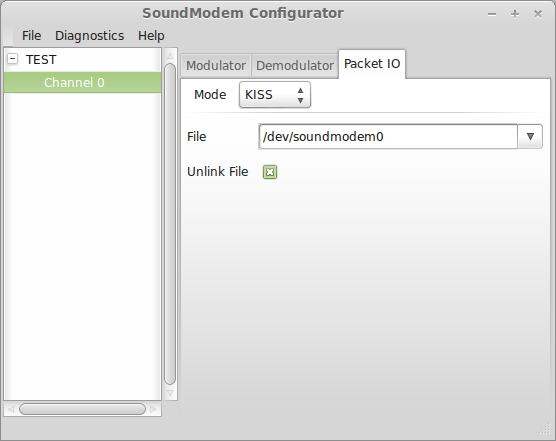
For the Packet IO tab, there are two choices: If you will be playing with TCP/IP, then you can select the MKISS mode and enter the IP details. If, however, you simply want a working sound modem to interface with Xastir for APRS, then select the KISS mode (without the M). The standard KISS option is probably safest if you just want a basic sound card modem as it requires less configuration. Depending on your choice:
- File: Leave the default path, /dev/soundmodem0.
- Unlink File: Yes (checked)
| MKISS | KISS |
 |
 |
|
|
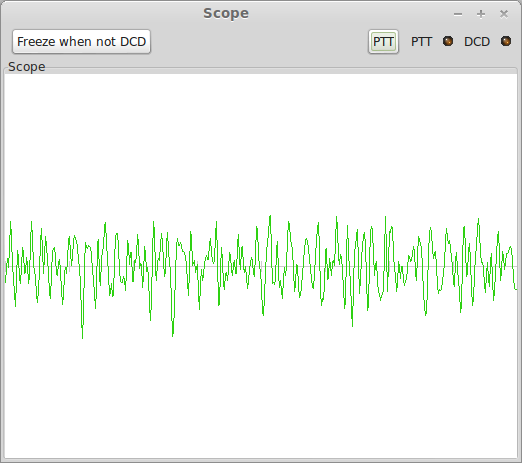
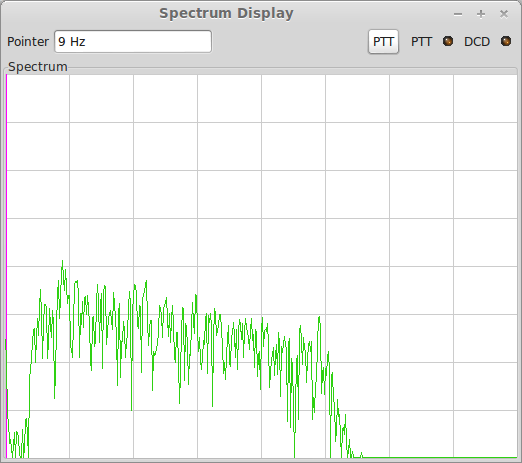
Finally, with your channel selected, you can use the Diagnostics menu to show you many things. Here below are the Scope (RX audio in time domain) and Spectrum (RX audio in frequency domain) shown. You need to set the levels up so these show correctly. You can also PTT the radio to set the TX audio levels.
| Scope | Spectrum |
 |
 |
Once you’ve completed the Packet IO tab, you can exit the program where it saves your configuration to /etc/ax25/soundmodem.conf. This is why you need to run the program as root.
The final step is to edit the /etc/ax25/axports file to include the newly added sm0 device. Edit the file to look like the following, only changing for your needs. Notice the speed of 4800 is not the radio speed, but the speed the soundmodem talks to the kernel – this is always 4800 (I think!).
# /etc/ax25/axports
#
# The format of this file is:
#
# name callsign speed paclen window description
#
sm0 M1GEO-1 4800 255 7 144.800 MHz (1200 bps) APRS
Once this is done, you’re ready to start the modem.
Firing things up
Once you’re ready to start the modem, simply run soundmodem as root. It needs to be root to create the network device, sm0. You can add “-v N” where N is a number corresponding to the verbosity you desire. If you used PulseAudio you will again need to set the source audio device feeding into the soundmodem (before you did soundmodemconfig).
Often when you start the soundmodem, programs running on the device decide to register and broadcast on the newly created network device. Samba (smbd and nmbd) are very typical examples. Either stop the processes while you play or edit their config and ban them from using the sm0 device (bind them to eth0 for example). MDNS is another example of a program that spews data out over AX25. These programs are from an era where dumping a few tens of kilobytes onto the network interface is fine, but with AX25 at 1200 baud, this will take seconds to send.
If you didn’t create an MKISS device, then you will simply have /dev/soundmodem0 in your filesystem and don’t have to worry about the consequences of TCP/IP and other programs as they won’t be interested in your new virtual KISS TNC. /dev/soundmodem0 handles exactly as if you had a TNC connected at this port address. There appears no difference from now on in how you use the modem.
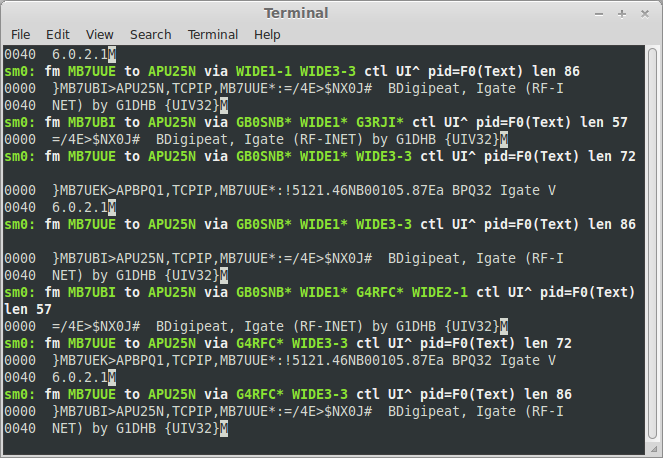
Once the interface has settled, you can treat it exactly as any other interface on the computer, with ifconfig for example. The image below is of axlisten a listening/monitoring program on the APRS frequency. The is started in colour for all interfaces with:
sudo axlisten -a -c
The transmitter is a little hard to test. You could always try to connect to a local station, here I connect to my node:

So I guess this shows us the basic functionality is working. We can see data being received and make a connection so have proved we can also transmit.
Setting up APRS
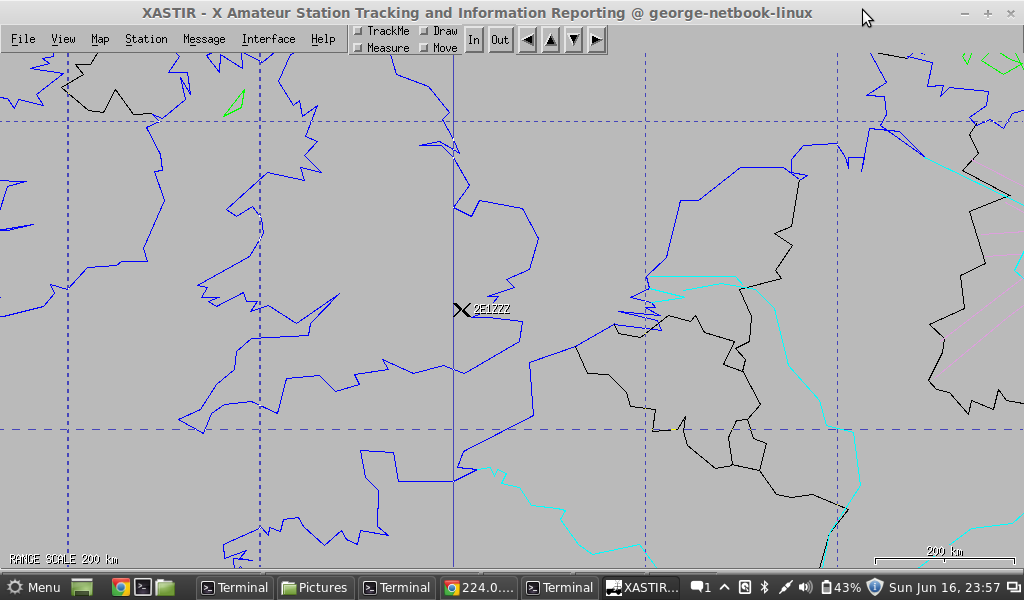
As mentioned above, we’ll use Xastir to do the mapping for us. There’s lots to say about Xastir, but for now, we’ll just worry about getting frames in from the sound modem we created above and plotting them on a map. Start Xastir and you’ll be presented with something like the following. This is version 2.0.0. When you first run it, it will ask you to enter the location and callsign of your station. This is detailed elsewhere.
Click on Interfaces on the menu bar, then on Interface Control.
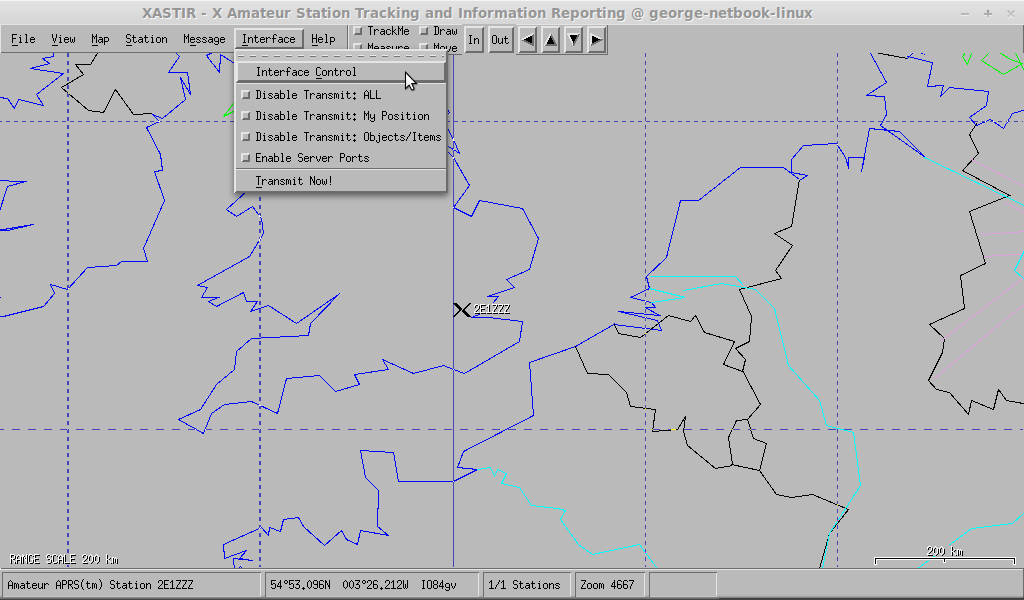
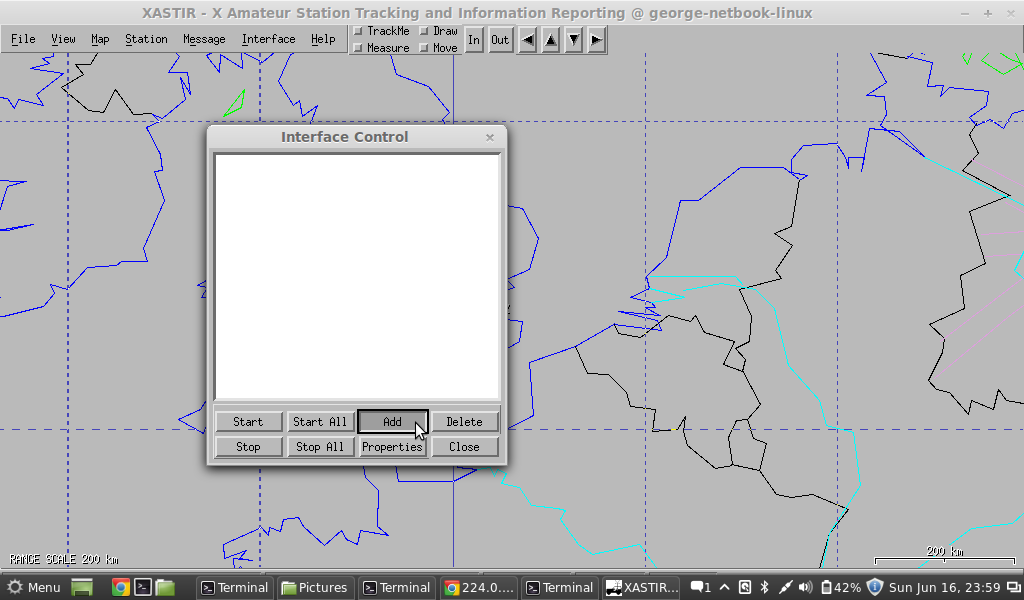
Then click on Add.
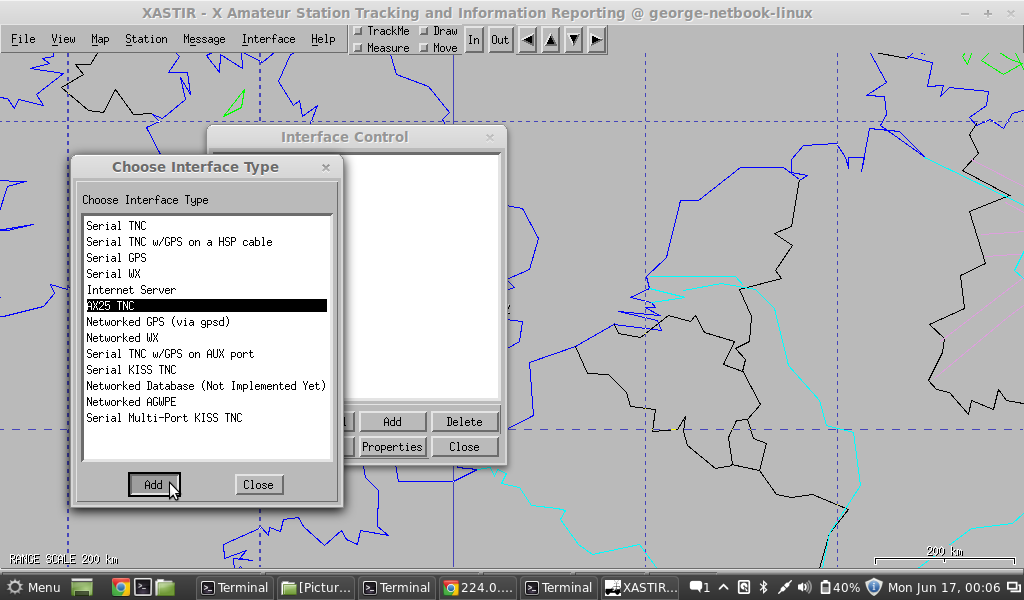
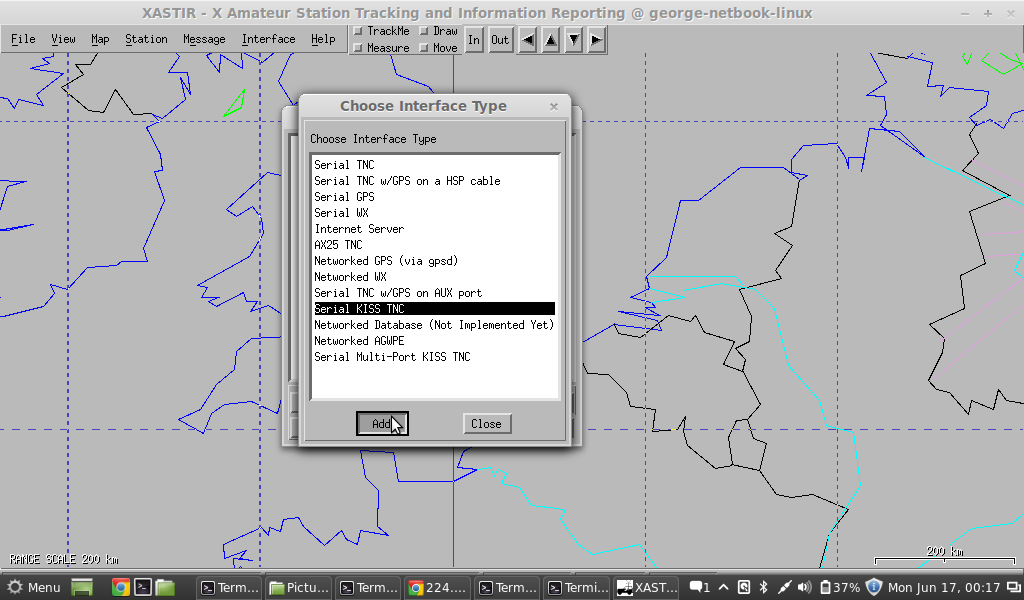
Then depending on if you used the MKISS or the KISS style soundmodem above, you either choose “AX25 TNC” or “Serial KISS TNC”.
MKISS / AX25 TNC
If you selected the KISS TNC type with the path /dev/soundmodem0 then skip to the next subsection. If you have created the device sm0, then this section applies.
Choose “AX25 TNC” and click Add.
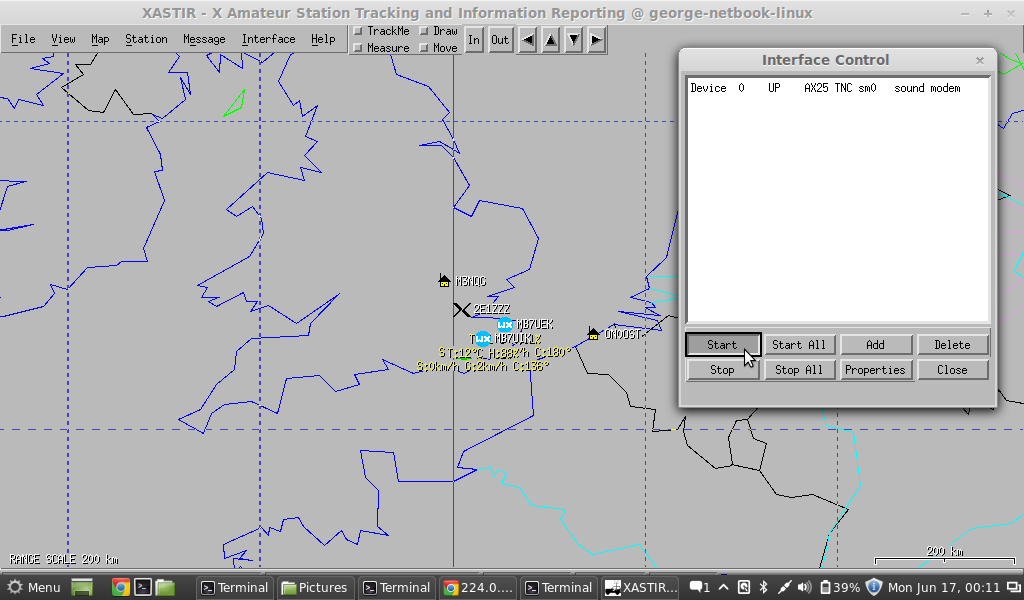
Configure the AX25 TNC as follows: Active on startup, checked. Allow transmitting, checked (up to you). Digipeat, again up to you. AX.25 Device name: “sm0”. Comment: “sound modem”. IGate Options are up to you, read up about this first. The paths stay as normal. Finish any other options and press OK.

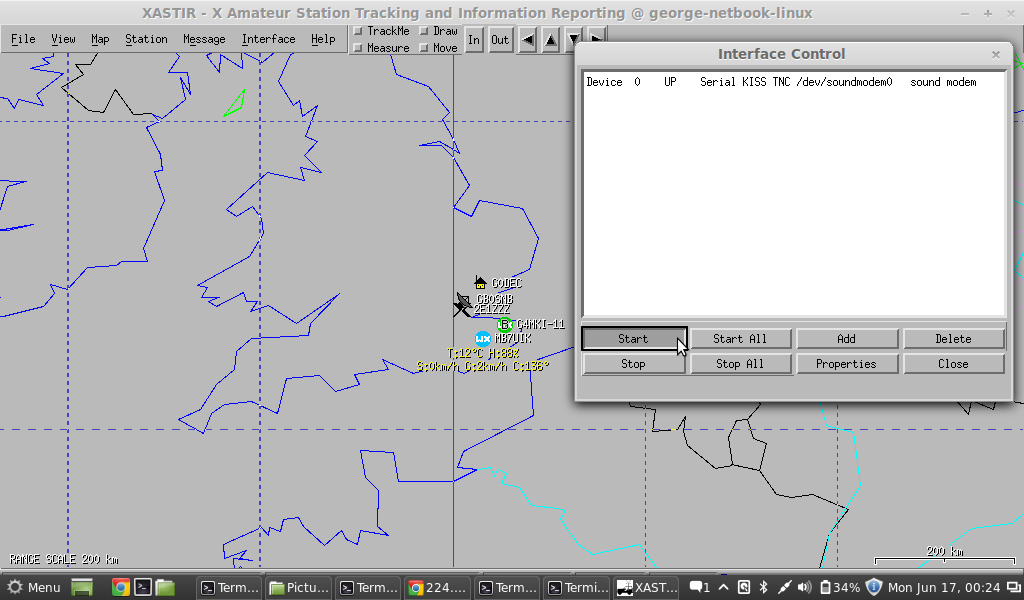
Click on the interface and then click Start to enable the use of this interface. You should see stations coming in and being added to the map as they are received. You can see this starting in the background.
KISS / Serial KISS TNC
If you have created the device sm0, then you need the section above. KISS TNC type with the path /dev/soundmodem0 this is your part!
Choose “Serial KISS TNC” and click Add.
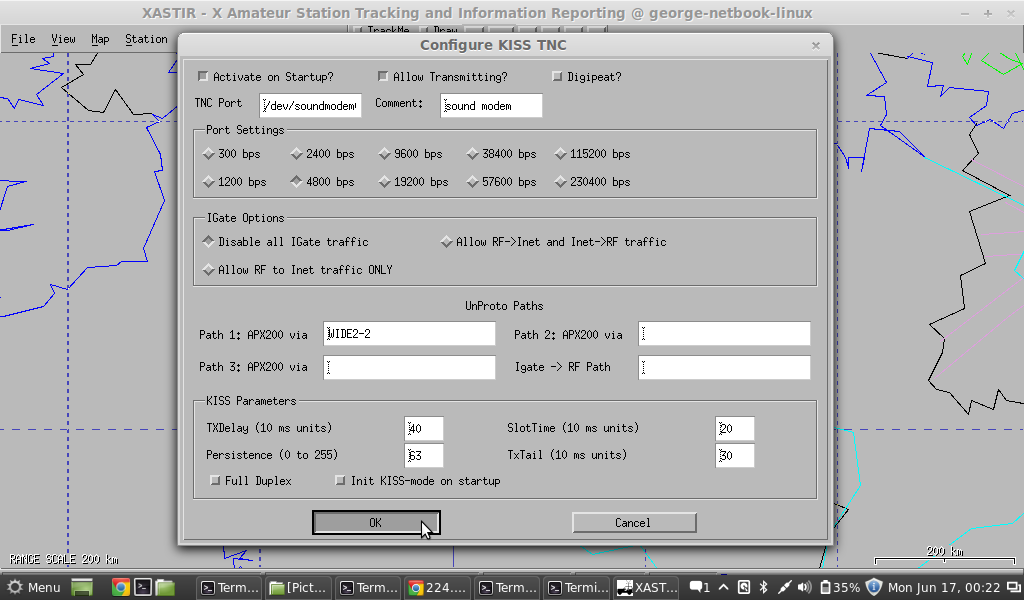
Configure the Serial KISS TNC as follows: Active on startup, checked. Allow transmitting, checked (up to you). Digipeat, again up to you. TNC Port: “/dev/soundmodem0”. Comment: “sound modem”. Port Settings, 4800 bps (this has nothing to do with the radio speed, but details how Xastir talks to soundmodem. IGate Options are up to you, read up about this first. The paths stay as normal. Make sure you don’t tick “full duplex” or “Init KISS-mode on startup” – they should always be unchecked. The default values for the other options should be okay. Finish any other options and press OK.
Click on the interface and then click Start to enable the use of this interface. You should see stations coming in and being added to the map as they are received. You can see this starting in the background.
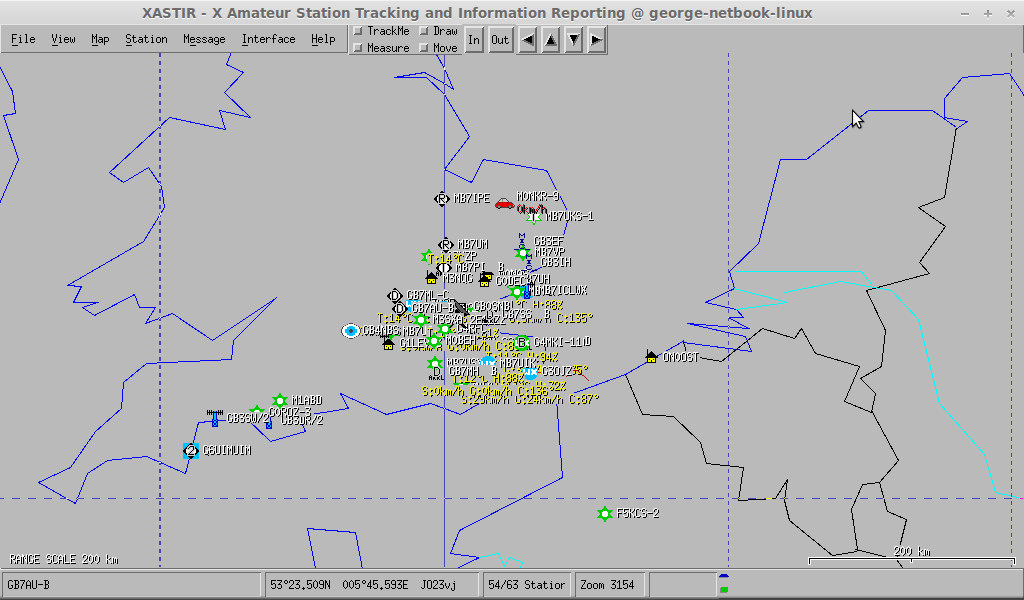
After around 20 minutes, the map had collected a fair few stations considering the antenna is fairly low.
Other Bits
In the UK Amateur Packet Radio Network (AMPRnet) block IPs (44.0.0.0) are distributed via the RSGB DCC as far as I understand. I had mine when I was running my Packet node, GB7EM, but the are no longer in use, and I never did use TCP/IP there anyway. I have two 44 block IPs, 44.131.189.64 and 44.131.189.65.
If you do not have such IPs, I think you would get away with using private IP addresses, such as those in the 10.0.0.0 block or 192.168.0.0 for example.