This page details my experimental AD9851 WSPR transmitter. Visit the WSPR page for my standard WSPR tests. These pages are also related to this, and may be of an interest to you: Arduino AD9851, Arduino RTTY, Arduino QRSS, 1W PA for 10MHz.
This page assumes that you already have an Arduino board and AD9851 DDS chip in some form, for example the DDS-60 board by AmQRP. See the Arduino AD9851 board for my solution.
Source Code for AD9851 Simple WSPR Transmitter You’ll need to generate your own data, as detailed in the text.
Theory of the WSPR Protocol
This section is the theory of how WSPR works. You do not need to understand any of this in order to make a WSPR transmitter. I worked through it because I was interested in the theory and maths. But I guess most people are not! 🙂
The first thing I did was see what frequencies were needed to be transmitted. This can be done with the WSPR program from the command line. Read the manual, WSPR Instructions found here. Most importantly the section entitled GENERATING A LIST OF TX TONE FREQUENCIES. This section describes making custom hardware or MCU solutions to transmit WSPR – exactly what I was trying to do! Wikipedia also has an interesting section, WSPR Protocol Specification, which contains some information. Edit: You can do this on the Arduino now, thanks to Justin NT7S’s JTencode library.
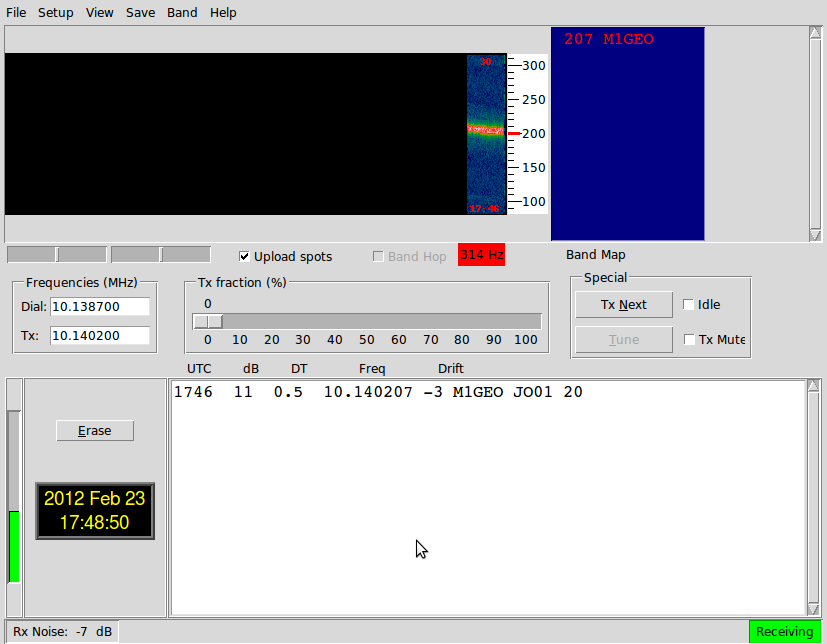
WSPR has a fixed standard message of the station’s callsign, 4-digit QRA locator and signal power in dBm. My example would be “M1GEO JO01 20” where M1GEO is my callsign, JO01 is the first 4 digits of my QRA locator and 20dBm (is roughly 100 mW). In total, 50 bits are used (28 for the callsign, 15 for the locator, and 7 for the power).
Using a high convolution code of length 32 and rate 0.5 as parameters for the forward error correction (messages are encoded in a redundant way, so the loss of information, here bits, has a greatly reduced impact on the quality of the message received) allows for a very redundant code.
If we expand this out, we can work out the number of binary symbols required to send this data. This convolutional encoding is explained mathematically here. Binary channel theory is explained here too. You don’t need to understand these, just to know it happens is enough. This is the theory of why it works, how averaging the noise, redundant encoding (FEC) and other measures will help our cause. Here, just believe me, this is how it works out – our original 50 bits become the following number of symbols:
Nsym = 2(B + K – 1) = 2(50 + 32-1) = 2(81) = 162 bits
The protocol specification states:
Each tone should last for 8192/12000 = 0.682666667 seconds, and transitions between
tones should be done in a phase-continuous manner.
This is a pre-chosen value, 8192/12000, (simplifies to 256/375) which was chosen because it works out nicely. Transmissions are a reasonable length of time, a computer sound-card can work with this value well.
Inverting this tone length, we get the tone separation:
Fsep = 1/Ttone = 1/(256/375) = 375/256 ~= 1.46 Hz
as specified in the protocol. Next we know that we’re using MFSK-4 (4 frequencies) with a separation of 1.4648 Hz, such that we can send our pseudo-random synchronisation vector. We work out the total occupied bandwidth,
BWtot = T x Fsep = 4 x 375/256 = 375/64 ~= 6 Hz
The 162-bit pseudo-random synchronisation vector (PRSV) serves to help the receiver to synchronise. It affords the receiving station some data that it knows to expect. It is able to find this pattern mixed in with your message (callsign, locator, power) and has therefore found your signal too. The 4 tones, mentioned above in our bandwidth calculation can be used to represent 1-bit of the PRSV and one bit of the message (00, 01, 10, 11). One of these four tones is called a channel symbol, and conveys one sync vector bit (LSB) and one data message bit (MSB). We send two bits at a time, hence 4 tones.
From here, we can work out the transmission time,
Ttx = Nsym x Ttone = 162 x 256/375 = 13824/125 ~= 110.6 s
The protocol also specifies that transmission timeslots start one second into the even UTC minute.
Using The WSPR Binary to Generate Tone Data
Edit: You can do this on the Arduino now, thanks to Justin NT7S’s JTencode library.
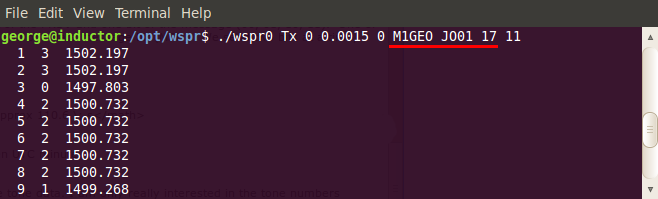
For a starting position, I decided to use the WSPR binary application to generate the tone data. I am only really interested in the tone numbers (second column). In case you skipped the theory section, the protocol specification is set out here: http://physics.princeton.edu/pulsar/K1JT/WSPR_Instructions.TXT and describes the many options to do with the WSPR binary command line. Here I just get the computer to generate my callsign, locator and power, 100 mW (M1GEO JO01 20). Note you need to use the WSPR.exe program or the wspr0 binary under Linux. Using the script just starts the WSPR GUI.
Old Versions:
$ ./wspr0 Tx 0 0.0015 0 M1GEO JO01 20 11
New Versions:
$ ./wspr0 -t -X -c M1GEO -g JO01 -dBm 20
If you’re running a Linux or Unix based system, running the command below will create you a list of tone numbers, separated by commas. If you’re running Windows, I’m sure there are ways to do this (one of which is doing it yourself). I can’t offer you any advice. Sorry.
$ ./wspr0 -t -X -c M1GEO -g JO01 -dBm 20 | awk ‘{print $2}’ | sed ‘:a;N;$!ba;s/\n/,/g’
3,3,0,2,2,0,2,0,1,0,2,0,1,1,1,0,2,2,3,0,2,1,2,3,1,3,1,2,0,2,0,2,0,2,3,2,0,1,2,1,2,
2,0,0,2,2,3,2,1,1,2,2,3,1,2,1,2,2,0,3,3,2,3,0,2,0,2,1,3,2,3,2,3,0,3,0,1,0,2,3,2,2,
3,0,3,3,0,0,2,1,1,0,1,0,3,0,2,2,1,0,0,2,0,2,1,0,2,3,0,0,3,3,1,0,3,1,0,0,1,3,0,3,0,
0,2,3,3,1,2,0,0,0,0,1,0,1,2,2,3,1,0,2,0,0,2,2,2,3,3,0,3,0,3,1,2,2,0,3,1,0,2,2
This data can then be input into your Arduino Code as a data array.
Simple WSPR Transmitter
Edit: You can do this on the Arduino now, thanks to Justin NT7S’s JTencode library.
You can use this data to transmit WSPR very simply. Putting this data into an array allows for easy recall in a sequenced manner. Here, I add the data into an array as you would expect to find in a C program. This is for Arduino v1, but is very universal. You can see how creating the comma separated list in the step above helped a lot!
byte WSPR_DATA[] = {3,3,0,2,2,0,2,0,1,0,2,0,1,1,1,0,2,2,3,0,2,1,2,3,1,3,1,2,0,
2,0,2,0,2,3,2,0,1,2,1,2,2,0,0,2,2,3,2,1,1,2,2,3,1,2,1,2,2,
0,3,3,2,3,0,2,0,2,1,3,2,3,2,3,0,3,0,1,0,2,3,2,2,3,0,3,3,0,
0,2,1,1,0,1,0,3,0,2,2,1,0,0,2,0,2,1,0,2,3,0,0,3,3,1,0,3,1,
0,0,1,3,0,3,0,0,2,3,3,1,2,0,0,0,0,1,0,1,2,2,3,1,0,2,0,0,2,
2,2,3,3,0,3,0,3,1,2,2,0,3,1,0,2,2};
The line breaks are for looks only. You could just as easily leave all the data on one single line. Make sure the end of each line ends with a comma, as this signifies that the data continues.
A simple way to read this data out of the array is to create a for-loop:
void wsprTX() {
int i = 0;
for (i=0;i<162;i++) {
wsprTXtone( WSPR_DATA[i] );
delay(683);
}
frequency(0);
}
Here you can see that the loop goes from the 0th element to 161st element sequentially incrementing the variable ‘i’. I in turn feeds into our array, picking the next element from WSPR_DATAeach time it is updated. This value is passed by compound statement (the value WSPR_DATA[# returns is input directly as the argument) to the function wsprTXtone(t) which translates this tone number into an actual frequency.
void wsprTXtone(int t) {
if ((t >= 0) && (t <= 3) ) {
frequency((WSPR_TXF + (t * 1.4648)));
}
}
When the wsprTX(void) function calls wsprTXtone(t) it is passed a number, as discussed representing the tone required. The first thing we do is to check the tone is valid (0 <= t <= 3). If it is, we can simply calculate the required tone offset by multiplying the passed parameter, t, with the tone offset, 1.4648 Hz. This value is added to WSPR_TXF in this example which is the absolute offset, defined elsewhere as 10,140,200 Hz. The frequency() function, as you might expect, sets the frequency of the DDS.
The last issue to tackle is the timing. As the protocol specifies, the transmission is to begin at 1 second into the even minute in UTC. For this there are a few options: DCF77 or WWVB time signals; An accurate Real Time Clock, or; GPS timing. There exists other possibilities to make the MCU clock very accurate in order to keep time inside the Arduino’s MCU. I will opt for the GPS as it is the easiest solution. DCF77 reception is poor in my area due to electrical noise. GPS signals will work well.
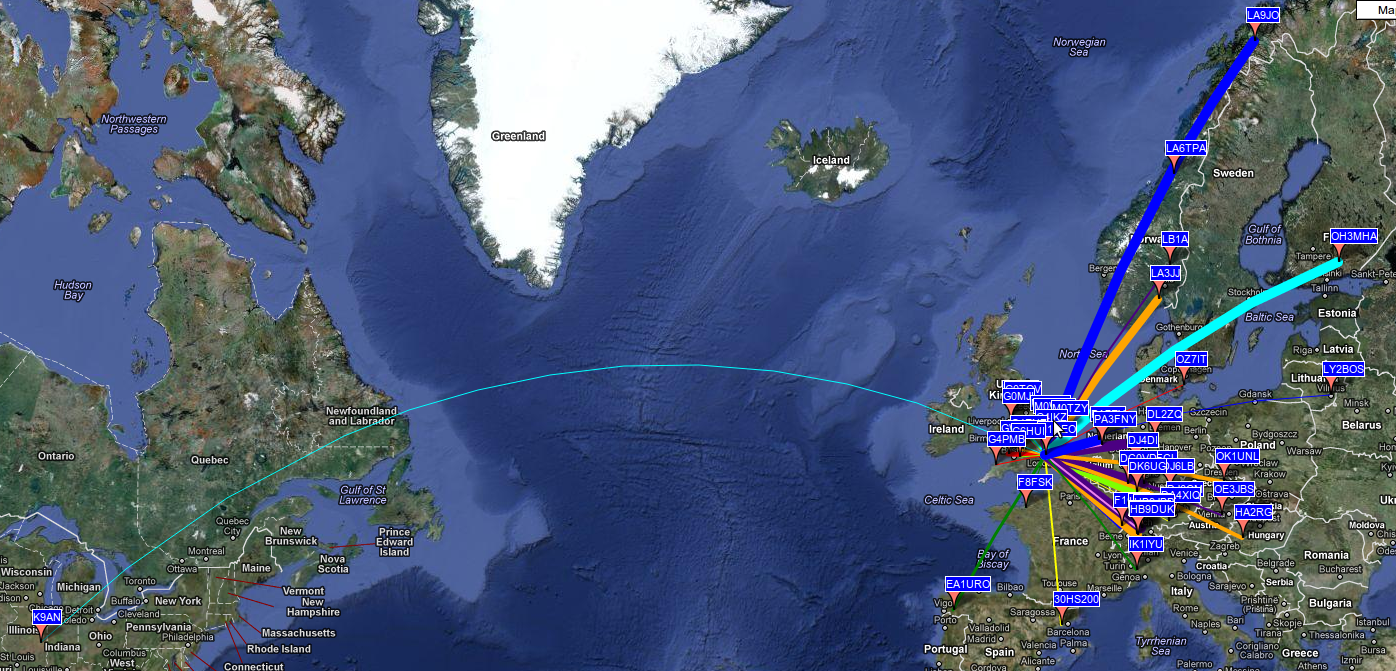
As a proof of concept, I wrote the code such that I could trigger the transmission myself in order that I be able to verify the data and transmission side of things. I am happy to report that my very first test was a success:
I hooked the simple WSPR transmitter up to a simple 2N7000 class-E HF power amplifier and set the output for a modest 200 mW (edit, now I would recommend using a BS170 MOSFET as Vgs is lower). Adjusting the reported power output as necessary, I transmitted a few WSPR frames throughout the morning on both 40- and 30-metres. Below is a map of where I got on 200 mW.
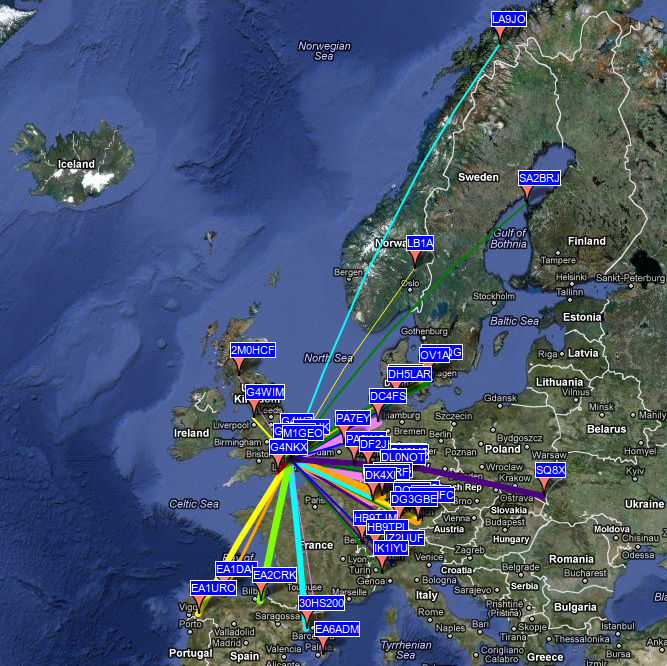
And the table below shows the best DX.
| Timestamp | Callsign | Frequency (MHz) | SNR | Drift | Grid | Power (W) | Reporter | Reporter Grid | Distance (km) | Angle (deg) |
| 2012-02-25 07:22 | M1GEO | 7.040194 | -25 | 0 | JO01cn | 0.2 | LA9JO | JP99gb | 2172 | 20 |
| 2012-02-25 15:28 | M1GEO | 10.140117 | -26 | -2 | JO01cn | 0.2 | SA2BRJ | KP03 | 1798 | 35 |
| 2012-02-25 18:46 | M1GEO | 10.140179 | -22 | -1 | JO01cn | 0.2 | SQ8X | KN19el | 1578 | 90 |
| 2012-02-25 06:46 | M1GEO | 7.040196 | -22 | 0 | JO01cn | 0.2 | EA6ADM | JM19lo | 1347 | 170 |
| 2012-02-25 10:08 | M1GEO | 10.140143 | -25 | -1 | JO01cn | 0.2 | LB1A | JP50mt | 1224 | 29 |
| 2012-02-25 14:08 | M1GEO | 10.140179 | -19 | -2 | JO01cn | 0.2 | EA1URO | IN62bh | 1196 | 214 |
| 2012-02-25 18:18 | M1GEO | 10.140216 | -21 | -1 | JO01cn | 0.2 | 30HS200 | JN01sh | 1144 | 174 |
This morning (29/Feb/2012), at about 7:00 GMT, I managed to make the WSPR trip to USA!