
This page was originally created to save me having to hunt down the drivers for my Epson Perfection 2480 Photo. Every time I upgrade distro I loose my scanner driver and firmware. So this time, I decided to create this page to keep everything I needed in one place. I make it public in the hope that it will help someone else.
Install Software
First of all, you need to install software. I use the sane scanner software, with graphical environment provided by xsane. We also need snapscan, which is provided by the libsane-extras package in Ubuntu.
sudo apt-get install xsane sane libsane-extras
Connecting the Scanner
This is pretty straight forward. USB from the PC to the computer. You can check that the scanner is found by using the lsusb command, as such:
george:~$ lsusb | grep -i Epson
Bus 003 Device 018: ID 04b8:0121 Seiko Epson Corp. Perfection 2480 Photo
This means that the computer can see the printer. If you don’t see this, check that your scanner is correctly connected, etc.
Firmware Installation
For the Epson Perfection 2480 Photo, the required firmware is esfw41.bin. You can download it by clicking here. Save this somewhere you can find it; your home directory or the system temporary folder, /tmp. Just as long as you can find it. Also be careful because although the guide refers to the file all in lower case, MediaWiki (this site’s CMS) has a tendency to capitalise the first letter.
From there, you can copy the firmware into the systems firmware folder, typically /lib/firmware, but do check. You will also need fxload to upload the firmware, but this is almost always installed already. Change into the directory where you saved your stuff, I use /tmp, and copy the firmware to the firmware directory:
george:/tmp$ sudo cp -v Esfw41.bin /lib/firmware/esfw41.bin
`Esfw41.bin’ -> `/lib/firmware/esfw41.bin’
Once you have put the firmware in the firmware folder, you then need to go and tell snapscan (provided by libsane-extras) where to find the firmware for our scanner. Snapscan’s configuration file is, by default, /etc/sane.d/snapscan.conf. nano the file:
george:~$ sudo nano /etc/sane.d/snapscan.conf
Hunt through (or search with CTRL+W) for firmware line, and then change it to reflect the path of our firmware.
firmware /lib/firmware/esfw41.bin
Save the file (CTRL+X; ‘Y’ to accept changes).
Test It
Unplug the scanner from the computer’s USB socket. Then power cycle the scanner (unplug, wait, then plug back in to the mains). Then reconnect the USB. This ensures that there is no firmware in the scanner, and that the computer will find it in a fresh state when you reconnect it. Once you’ve done this, then fire up XSane:
Applications > Graphics > XSane Image scanning program
In the preview window, press the Acquire Preview button and the scanner should whirr into action. The first image I scanned, below, is from the book “Radio Wave Propagation and Antennas: An Introduction” by John Griffiths, page 126. It was the first image I scanned in after writing this page. The image is a PNG image at 300dpi in black and white.
OCR
If you are looking for OCR software for linux, then have a look at this page: http://www.splitbrain.org/blog/2010-06/15-linux_ocr_software_comparison as it contains some tests and comparisons between different software types. I chose tesseract based on the test results and the comments on the page. You can install it from the repositories:
sudo apt-get install tesseract-ocr
Then to use the tesseract, you need to have a tif image. I used ImageMagick’s convert with the command:
convert Cornu_Spiral.png -depth 8 -alpha off out.tif
Then calling tesseract with the command:
tesseract out.tif test
The following is the output from tesseract of the above test image:
george:~$ cat test.txt
126 Space Wave Propagation in the Troposphere Chapter 4
0.7 1.5
2.5
0.6
0-5 Q 3.0
v = 1.0
0.4
0.3 2.0
0.2
0.1
0.8 0.7 0.6 0.5 0.4 0.3 0.2 0.1 0 _ 05
rv 0.1 0.2 0.3 0.4 0.5 0.6 0.7 0.8
– ()_5 0.1
0.2
– 2.0 0-3
U = -1.0 0-4
° â 0.5
â 3.0Z
0.6
– 2.5
0.7
â 1.5
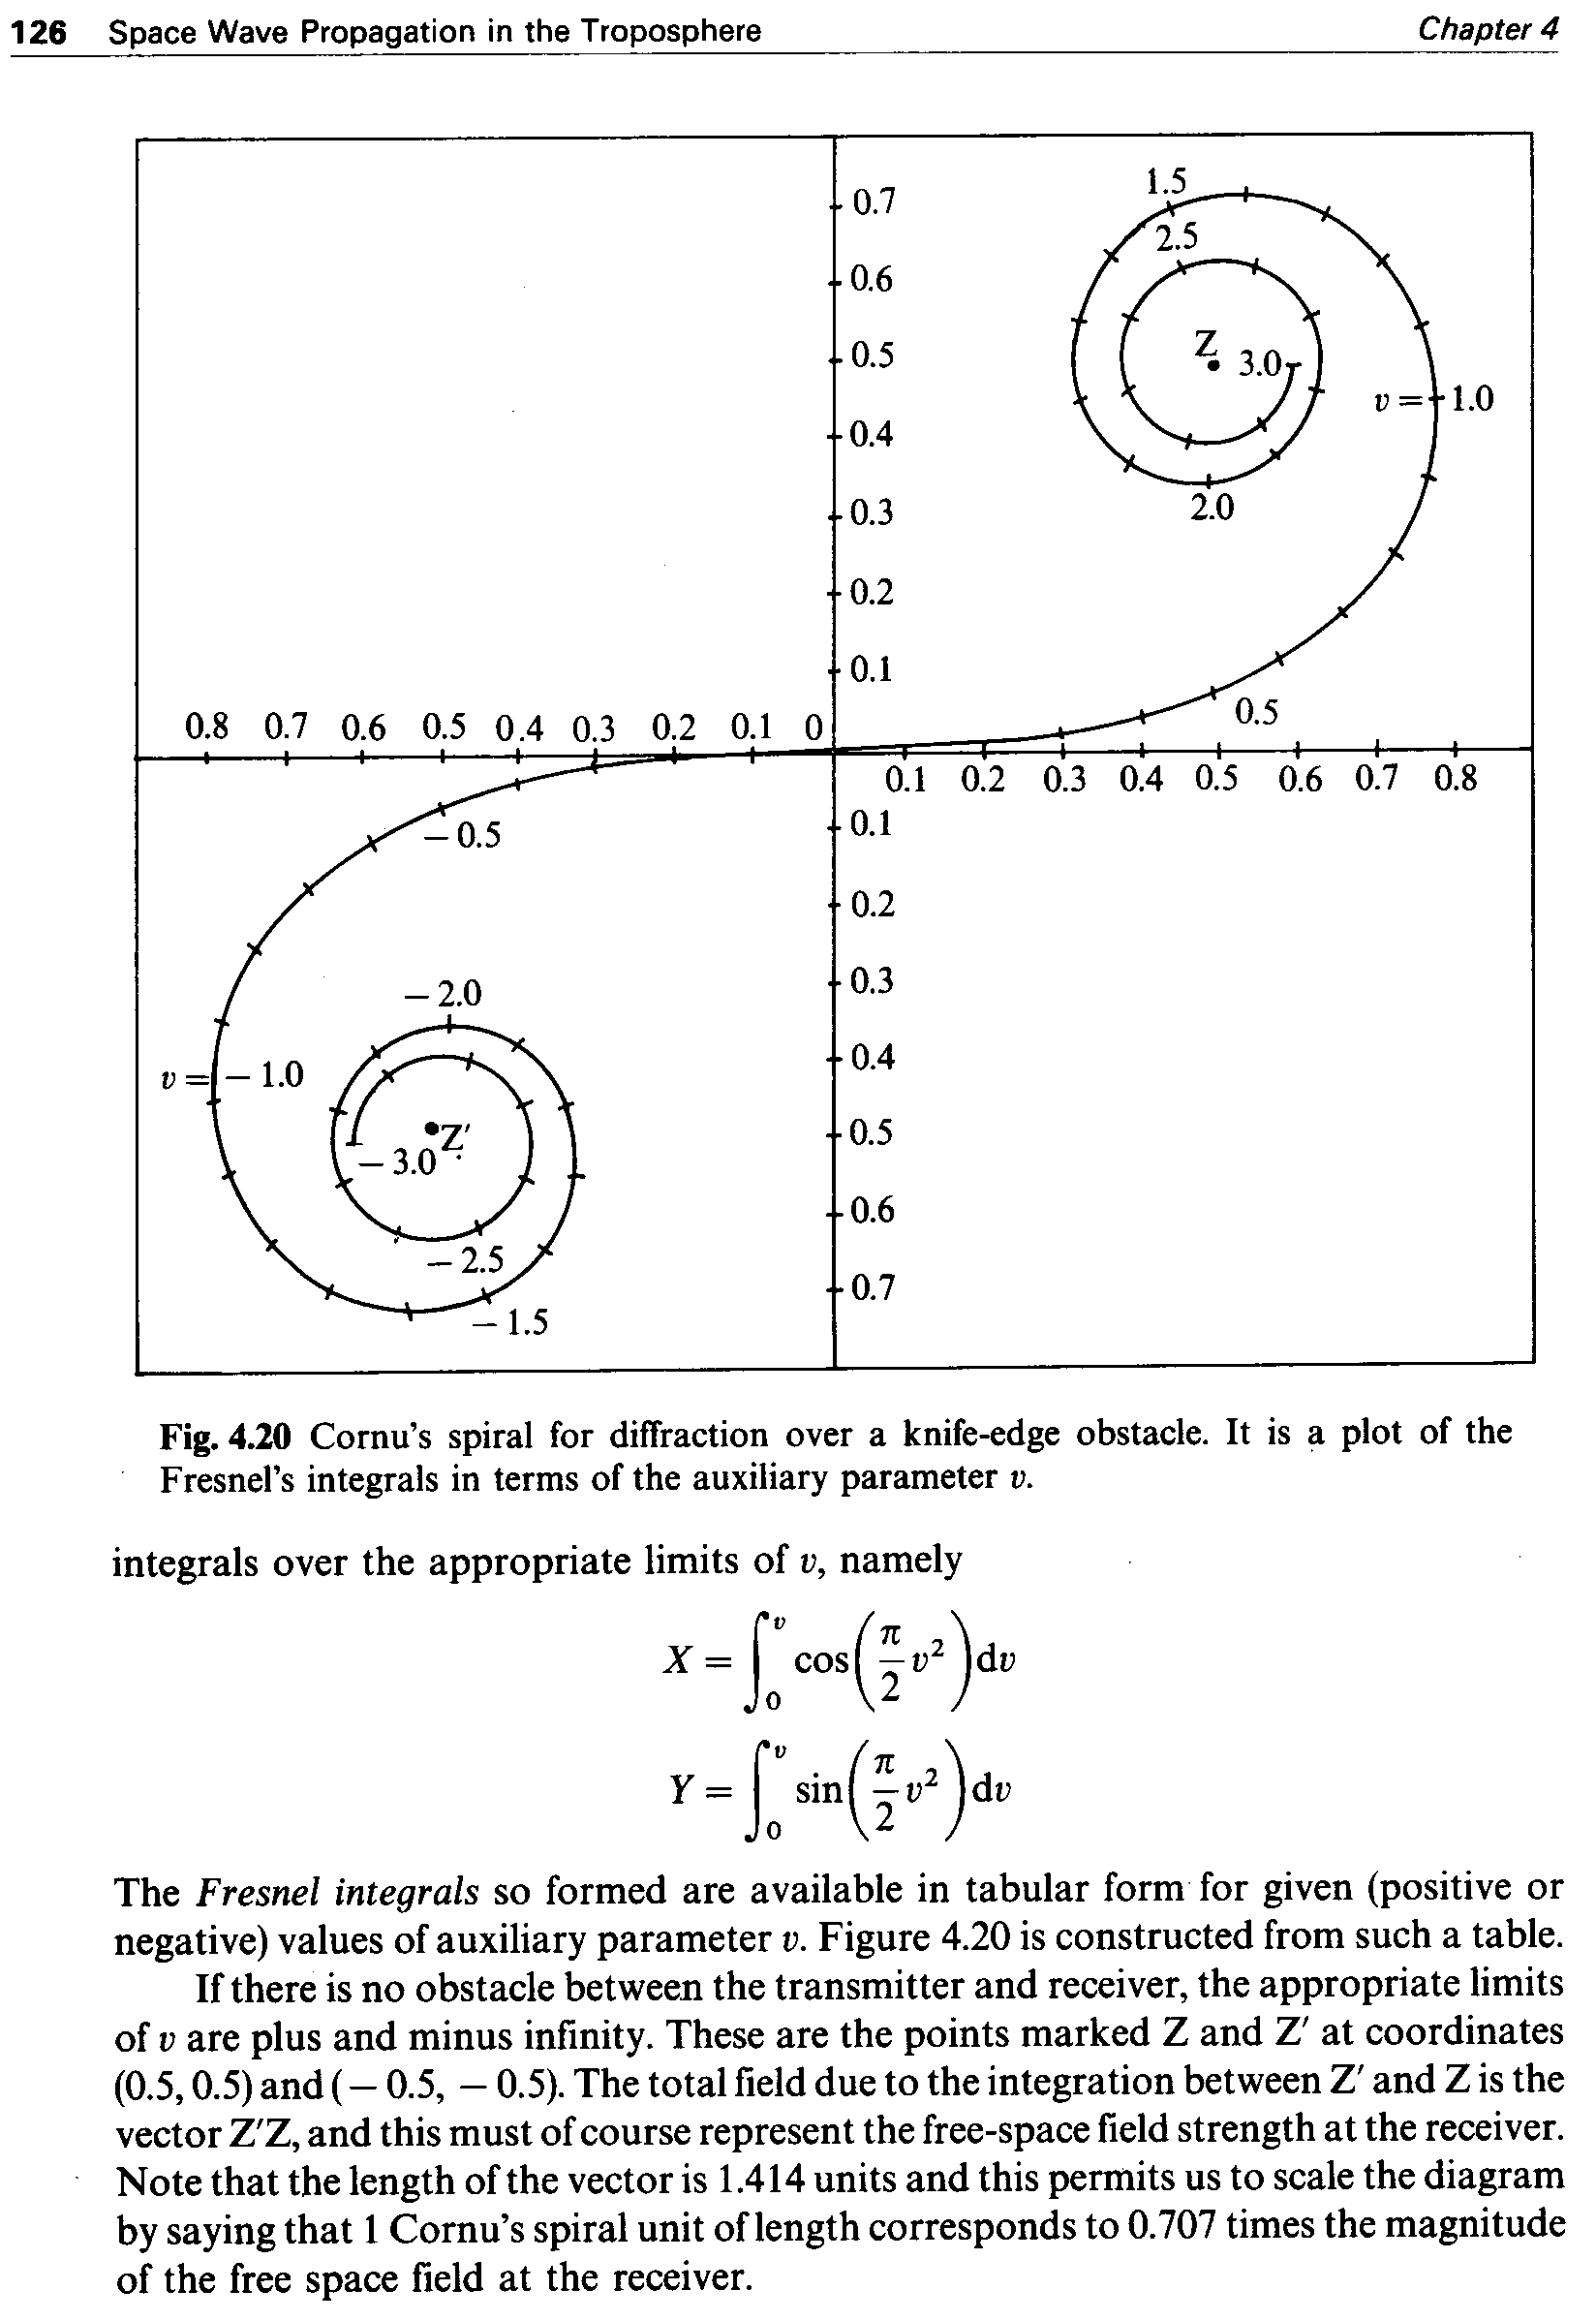
Fig. 4.20 Cornuâs spiral for diffraction over a knife-edge obstacle. It is a plot of the
â Fresnelâs integrals in terms of the auxiliary parameter v.
integrals over the appropriate limits of v, namely V
I)
X =j` cos<Ev2)dv
0 2
I}
Y = sin E v2 dv
0 2
The F resnel integrals so formed are available in tabular form for given (positive or
negative) values of auxiliary parameter v. Figure 4.20 is constructed from such a table.
If there is no obstacle between the transmitter and receiver, the appropriate limits
of v are plus and minus infinity. These are the points marked Z and Z’ at coordinates
(0.5, 0.5) and ( â 0.5, â 0.5). The total field due to the integration between Z’ and Z is the
vector ZâZ, and this must of course represent the free-space field strength at the receiver.
0 Note that the length of the vector is 1.414 units and this permits us to scale the diagram
by saying that 1 Cornuâs spiral unit of length corresponds to 0.707 times the magnitude
of the free space field at the receiver.
It is important to note that the formulae and graphs are ignored, as you would expect. I was impressed.
Sources
- UbuntuForums – Thread: [ubuntu] [SOLVED] How do I set up an Epson 2480 scanner, by bwallum
- http://ubuntuforums.org/showpost.php?p=6129945&postcount=2
- Linux OCR Software Comparison, by splitbrain
- http://www.splitbrain.org/blog/2010-06/15-linux_ocr_software_comparison
- Optical Character Recognition With Tesseract OCR On Ubuntu 7.04, HowToForge
- http://www.howtoforge.com/ocr_with_tesseract_on_ubuntu704