After moving to a new house in Norfolk, we had some problems with the internet connection. After we got the initial dodgy cable connections out of the way, I wanted to monitor the internet connection service for a while.
I decided to make a simple script to monitor test the connection, and use cron to call the script regularly. The script would also need to append the latest test results to a file.
There was some interest on Twitter about the script and how I managed to get this working, so I decided to write it up here, as people seemed interested. This is not a thorough explanation, but a working example.
Measuring the Connection
I suppose many of you are familiar with SpeedTest.Net. My first thought was to run a test with that, and scrape the HTML output from the page. While looking if it had been done before (never reinvent the wheel) I came across a command line interface to SpeedTest.Net, called speedtest-cli which can be found on github here.
The basic command speedtest-cli performs a test, reporting ping, download and upload bandwidth, something like the following:
george@marconi:~$ ./speedtest-cli
Retrieving speedtest.net configuration…
Retrieving speedtest.net server list…
Testing from University College London (128.40.255.50)…
Selecting best server based on latency…
Hosted by Virgin Media (London) 0.96 km: 6.456 ms
Testing download speed………………………………….
Download: 760.40 Mbit/s
Testing upload speed…………………………………………..
Upload: 399.64 Mbit/s
george@marconi:~$
The script automatically picks the closest server. You can hard-choose a server, using the –server SERVERID command, where SERVERID comes from the –list command. A small section of servers, sorted by distance is shown below, where the number before the bracket is the SERVERID number:
2789) Vodafone UK (London, Great Britain) 0.96 km
3728) Virgin Media (London, Great Britain) 0.96 km
5980) SoftLayer Technologies, Inc. (London, Great Britain) 0.96 km
6151) Burstfire Networks Ltd (London, Great Britain) 0.96 km
4078) Vorboss Limited (London, Great Britain) 0.96 km
6032) fdcservers.net (London, Great Britain) 0.96 km
6115) Cybersmart Pty Ltd (London, Great Britain) 0.96 km
To force the test to be done with a specific server, you run speedtest-cli –server 6151, for example.
george@marconi:~$ ./speedtest-cli –server 6151
Retrieving speedtest.net configuration…
Retrieving speedtest.net server list…
Testing from University College London (128.40.255.50)…
Hosted by Burstfire Networks Ltd (London) 0.96 km: 4.62 ms
Testing download speed………………………………….
Download: 678.21 Mbit/s
Testing upload speed…………………………………………..
Upload: 370.13 Mbit/s
george@marconi:~$
The only other useful command is the –simple flag which reduces the output to just the test results. These can then be parsed by a shell script and saved into a log file.
george@marconi:~$ ./speedtest-cli –server 6151 –simple
Ping: 2.908 ms
Download: 716.53 Mbit/s
Upload: 222.54 Mbit/s
george@marconi:~$
From here, we can write a script to log these results.
Measuring & Logging Script
With the measurement command outputting useful numbers, we can then attempt to parse this data and save it. The easiest way to do this is to write the results to a temporary file, parse the temporary file for the bits you want, save the results, and remove the temporary file. That’s exactly what the script below does. The script below is called speedtest-cli-save
#!/bin/bash
echo -n “Start: ” > /tmp/speedtest.tmp
date >> /tmp/speedtest.tmp/home/george/speedtest-cli –simple –server 4204 >> /tmp/speedtest.tmp
echo -n “Stop: ” >> /tmp/speedtest.tmp
date >> /tmp/speedtest.tmpDATE=`date +”%D”`
TIME=`date +”%T”`
PING=`cat /tmp/speedtest.tmp | grep Ping | sed -e “s/.*: //” -e “s/\ //”`
UPLD=`cat /tmp/speedtest.tmp | grep Upload | sed -e “s/.*: //” -e “s/\ //”`
DNLD=`cat /tmp/speedtest.tmp | grep Download | sed -e “s/.*: //” -e “s/\ //”`echo “$DATE,$TIME,$PING,$DNLD,$UPLD” >> /home/george/speedtest.txt
Each time the above script is run, performs a speedtest using the command line program, and saves the results, here to ‘/home/george/speedtest.txt’. The column format is “date, time, ping, download speed, upload speed”
03/05/16,11:01:17,51.369ms,4.58Mbit/s,0.28Mbit/s
Using Cron
The above script is saved as /home/george/speedtest-cli-save and when run, appends the test data to the end of the file /home/george/speedtest.txt which is a CSV file. To perform regular periodic sampling of the internet speeds, I use cron to initiate the speedtest-cli-save script, and thus the test.
My cron entry in crontab looks like the following:
# m h dom mon dow command
*/15 * * * * /home/george/speedtest-cli-save
This executes the script every 15 minutes, every hour of the day, every day of the week, every month.
Viewing the Results
The resulting CSV file, here, /home/george/speedtest.txt, looks something like this, depending on your Internet measurements.
03/07/16,09:31:17,226.589ms,4.63Mbit/s,0.00Mbit/s
03/07/16,09:46:11,189.813ms,4.67Mbit/s,0.00Mbit/s
03/07/16,10:01:16,307.717ms,4.54Mbit/s,0.05Mbit/s
03/07/16,10:16:27,306.419ms,3.85Mbit/s,0.00Mbit/s
03/07/16,10:30:50,231.194ms,4.52Mbit/s,0.00Mbit/s
03/07/16,13:45:54,58.919ms,4.75Mbit/s,0.00Mbit/s
03/07/16,14:01:02,54.287ms,4.62Mbit/s,0.00Mbit/s
03/07/16,14:16:07,137.906ms,4.76Mbit/s,0.00Mbit/s
03/07/16,14:30:58,52.558ms,4.76Mbit/s,0.00Mbit/s
03/07/16,14:46:08,56.767ms,4.75Mbit/s,0.00Mbit/s
03/07/16,15:01:15,58.405ms,4.72Mbit/s,0.05Mbit/s
03/07/16,15:16:00,55.406ms,4.77Mbit/s,0.00Mbit/s
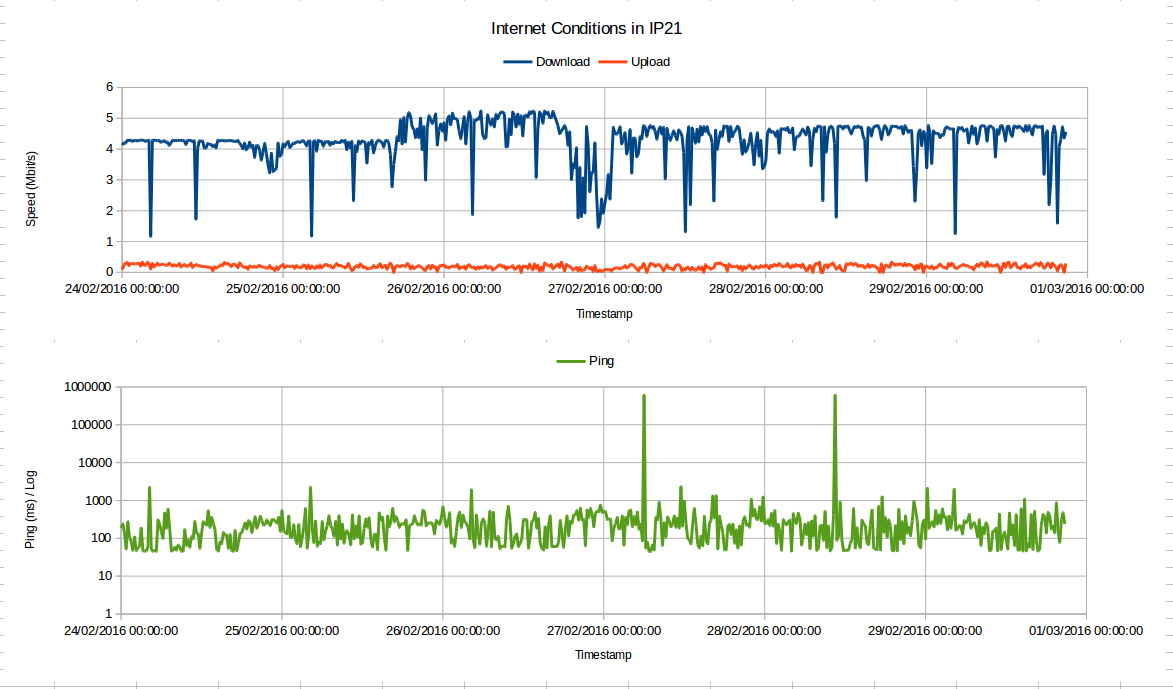
By opening the CSV data or copy/pasting into LibreOffice (or Microsoft Excel, etc.), you can graph the results as a function of time. Care should be taken when formatting the date and time, especially on longer runs. You can see here that the upload is pretty poor, and the ping very variable.
From this data, it is easy to use standard office skills to generate an X-Y scatter graph showing the bandwidths and ping, such as below.