
This page is an updated version of Xilinx JTAG Linux OLD. If you are having problems with older versions of Ubuntu or the Xilinx ISE, then check out the old page, Xilinx JTAG Linux OLD. This is updated for Ubuntu 11.04 and Xilinx ISE 13.2.
If you make copies of this page or rehost it, please host your own images. My poor Server can’t cope!
Introduction
If you found this information helpful, you can Donate a small sum of money (of your choosing) to help me get through my degree and for the upkeep of this server. You may contact me here.
This page originally gave a basic howto on installing the cable drivers for the Xilinx ISE (specifically iMPACT) under Linux/Unix. The page was well received, and I got many emails with various problems, which we overcome 🙂 This page was modified to include the ISE installation. This was prompted by me having to reinstall ISE on Ubuntu 9.10 (64-bit). This method I have tested on Ubuntu 8.04, 10.04_beta and Mint Gloria. It should certainly be valid for any Debian based system, and probably any system where it is possible to do what I have suggested.
This Install Guide was written with Ubuntu 11.04 64-bit Desktop Edition and Xilinx ISE 13.2. Last tested by me on Ubuntu 13.10, Xilinx ISE 14.7
Finally, I am no expert in any of this: FPGAs, Xilinx or Linux. I just applied what knowledge I did have, and made it work. I offer my experience as help to you.
Installing Xilinx ISE
When installing Xilinx ISE, make sure that the installer is located on the hard drive. The installer needs to have write permissions to the setup files. Burning the files to DVD has been reported to create problems.
Download Xilinx ISE from their website. This guide assumes you have Xilinx_ISE_DS_Lin_13.2_O.61xd.0.0, which is the full version. However, the webpack should work in the same manor.
Extract the archives to a place with read and write permissions, and chmod the installer file executable my all. To do this, change into the folder with the installer files are located and issue the command
sudo chmod a+x xsetup
Then you are ready to install the ISE suite. I suggest you do this as root. To start the installer, enter the following command:
sudo ./xsetup
Go though the menus, as they are fairly obvious. Here are my suggested responses:
- Next the welcome screen.
- Accept the License Agreement (part 1).
- Accept the License Agreement (part 2).
- Except the default install path of /opt/Xilinx/13.2 – Feel free to change this, but the rest of this guide assumes you have not.
: Also note, when working and referring to this path, that Xilinx begins with a capitalised X.
- Select what you wish to be installed. I chose everything, but if you’re using a free WebPACK license, then just install that; save yourself the 15GB disk space!
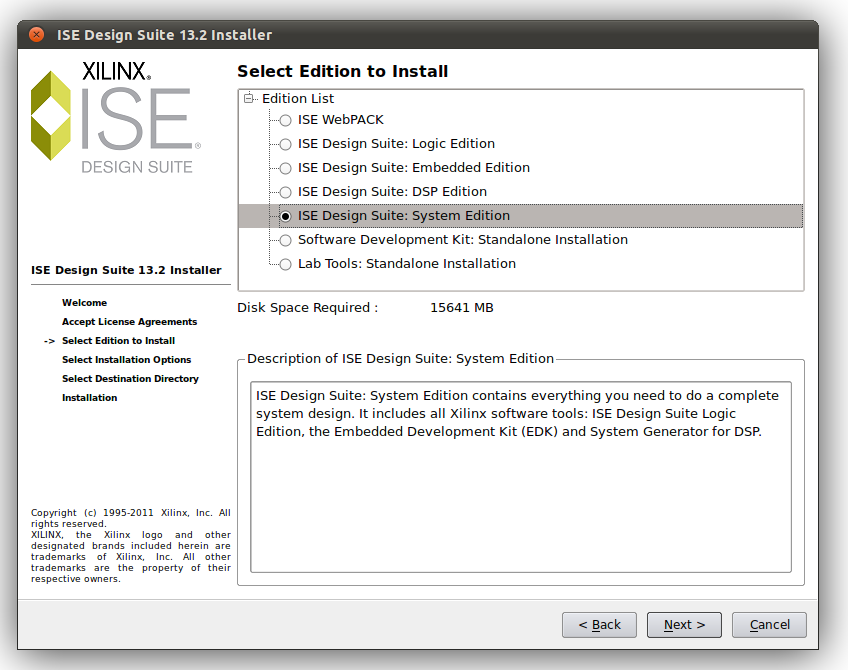
- You next have to select the last few installation options:
- * Check Aquire/Manage a License Key.
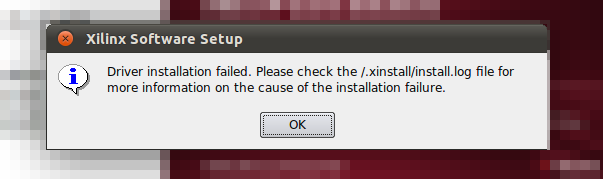
- * Uncheck Install cable drivers (does not work, use the method outlined below) – Saves you having to okay the dialog when it eventually fails! (see image below)
- * Check Enable WebTalk (stops it complaining if you use WebPACK).
- Leave the default path, /opt/Xilinx/13.2
- Review the proposed installation stuff, and start the install
- Wait for a small eternity.
- The Xilinx License Configuration Manager should appear:
: Select what best describes what you need. The “Start ISE WebPack” gives you unlimited access to fundamental applications, but not to everything. for help on what does what, check out the Xilinx Software Matrix, here. At this point, I select “Get my Purchased Licenses”. This opens Firefox (or your default web browser), and asks you to log into their system. You can download your licenses file from them, and browse to it using the “Copy License” button under the “Manage Xilinx License” tab. Either way, get a license from Xilinx. Once you have done so, close the License Config Manager.
- You should be told Installation is complete 🙂 Press Okay.
- Move onto the next steps of installing cable drivers.
Errors with SysGen under Ubuntu 13.10 and ISE 14.7
I found this error while trying to launch the System Generator under ISE 14.7:
$ sysgen
/opt/Xilinx/14.7/ISE_DS/ISE/sysgen/util/sysgen: 82: /opt/Xilinx/14.7/ISE_DS/ISE/sysgen/util/sysgen: Syntax error: “(” unexpected
The answer is simple. You need to edit the sysgen script, /opt/Xilinx/14.7/ISE_DS/ISE/sysgen/util/sysgen and replace the top line to use bash instead of sh
sudo nano /opt/Xilinx/14.7/ISE_DS/ISE/sysgen/util/sysgen
and replace
#!/bin/sh
with
#!/bin/bash
You should now find that System Generator works.
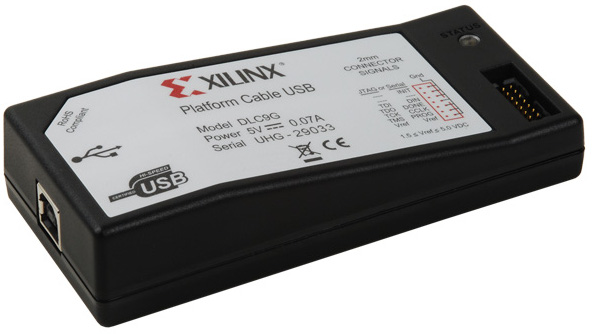
Using Xilinx USB JTAG Programmers under Linux (Installing Cable Drivers)
Assuming you have followed the above installation howto, this next section should follow on. If you jumped straight here to this section the next section on installing Cable Drivers should standalone. If you have problems, please check that you have similar options set in your ISE install to those I outline in the previous section.
Getting what’s needed
First of all, this guide assumes you have installed Xilinx ISE (version 11.1 is used here) into the default path of /opt/Xilinx
Next, you will need to have GIT installed to get the required libraries. This approach does not use the official Xilinx libraries but a replica of them. You will also need libusb-dev which is required in the compiling of the drivers. You will also need build-essential metapackage for the compiler. On a 64-bit host, you will need to get the 32-bit version of libc6-dev-i386.
On 32-bit
sudo apt-get install gitk git-gui libusb-dev build-essential libc6-dev fxload
On 64-bit
sudo apt-get install gitk git-gui libusb-dev build-essential libc6-dev-i386 fxload
Philipp Hörauf reports there is a need to install ia32-libs-dev on some 64-bit systems, though I didn’t require this.
Download the driver source
You should firstly change to the installation directory. You need (assuming default install path) to change directory to /opt/Xilinx. Then you will be required to use git to download the source.
cd /opt/Xilinx
sudo git clone git://git.zerfleddert.de/usb-driver
Compiling the Driver
This step is once simple command, but the most important. It compiles the cable driver required. There are two versions depending on the version (32-/64-bit) of Xilinx ISE you have. Firstly change into the source directory created in the previous step. Then you need to issue the make command.
cd usb-driver/
sudo make
Since the drivers now support 64-bit too, you don’t need to build the 32-bit version. If you have trouble, try sudo make lib32 to build the 32-bit driver.
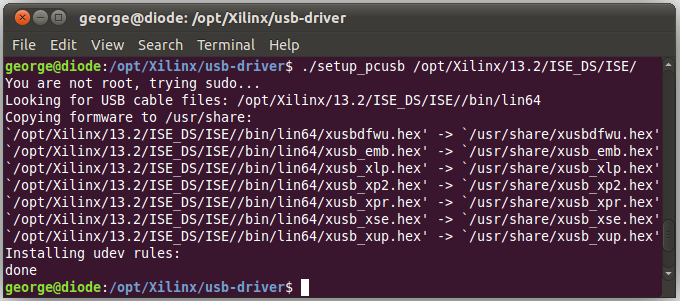
Setting up the Cable Driver
The newer versions of the usb-driver come with a setup script, which is very useful! You can run setup_pcusb and have it do all the complicated stuff for you, thusly…
george@diode:/opt/Xilinx/usb-driver$ ./setup_pcusb /opt/Xilinx/13.2/ISE_DS/ISE/
Fixing the Path
This step may not be required if the Xilinx install appends to your .bashrc automatically:
Running the following two lines will add the Xilinx path to the system path, and will ensure that the Xilinx binaries are accessable by the system.
32-bit
echo “PATH=\$PATH:/opt/Xilinx/13.2/ISE_DS/ISE/bin/lin” >> ~/.bashrc
echo “export PATH” >> ~/.bashrc
64-bit
echo “PATH=\$PATH:/opt/Xilinx/13.2/ISE_DS/ISE/bin/lin64/” >> ~/.bashrc
echo “export PATH” >> ~/.bashrc
Some people reported that the 32-bit version didn’t work correctly on 64-bit host.
Ensure you are using the 64-bit version of the ISE software.
The 64-bit stuff is located in /opt/Xilinx/11.1/ISE/bin/lin64/
Connect the Programmer
Once you get to this point, the cable drives have been installed, and you’re now ready to connect the Xilinx USB JTAG Programmer to the PC’s USB port. If you follow the computer’s system log (kernel messages) then you should be able to see the process of flashing the firmware happening as well as the Firmware light on the programmer illuminate.
On the Spartan-3E board shown here in the video, you can see the firmware light to the left of the USB socket. The screen is split, showing you the webcam video on the left and the kernel messages on the right.
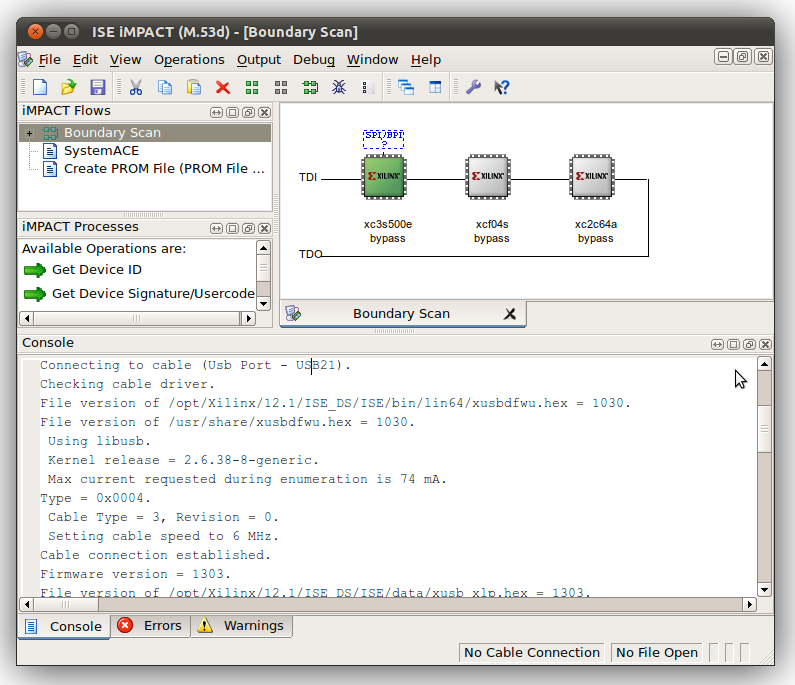
iMPACT
iMPACT seems to reliably crash for me every time I do a boundary scan.
george@diode:/opt/Xilinx$ cat /home/george/_impact.log
iMPACT Version: 13.2iMPACT log file Started on Sat Jul 30 00:46:45 2011
Welcome to iMPACT
iMPACT Version: 13.2
// *** BATCH CMD : setMode -bs
GUI — Auto connect to cable…
// *** BATCH CMD : setCable -port auto
Xilinx ISE 12.1 will perform a boundary scan just fine. Seems to be an issue with ISE 13.2.
Issues, Problems & Troubleshooting
I had no issues with this approach; In fact, it surprised me how simple it had become. If you do have problems, there is much more depth to the old tutorial, which you can view here. It has a troubleshooting section, too!